
USER MANUAL
v1.2
Welcome — and thank you.
Thank you for choosing MONKEY MASTERING. By installing this plugin you become part of a small community of producers, engineers and artists who believe that mastering should not be a mystery, a bottleneck or a premium service reserved for a few.
MONKEY MASTERING was built with one obsession: getting your music to sound finished, loud, clear and ready for any platform — without forcing you to chain ten plugins or hire someone else. Every decision inside the engine was taken with real productions in mind: the bedroom beat, the professional mix, the live-to-stage master, the Spotify drop at Friday 00:00.
Everything you will read below is there to make you autonomous. Take your time, experiment, and trust your ears.
— Javier J. Redondo · musician and developer · Canary Islands, Spain
Contents
- What MONKEY MASTERING is
- Design philosophy
- System requirements
- Installation
- Getting started
5.1 Where it goes
5.2 Your first master — 3 phases, 6 steps
5.3 Key tips - The interface, section by section — EXPERT
6.bis BASE — the same interface, folded - Modes and signal chain
- Track types (16)
- Music styles (24)
- PLATFORM — where your master is going
10.bis Raw export and REC - 5-band parametric EQ
- Compression and compression modes
- De-esser
- Sidechain
- Stereo Width and Mid/Side
15.bis IMAGING — per-band stereo image (Pro) - Clipper with oversampling
- True-Peak Limiter
- Dithering
- EXTRAS (Pro)
- Reference Track (Pro)
- Automatic spectral analysis
- Stem Separator (Pro)
- Virtual Speaker
- LUFS meter
24.bis PROOF — verify your master
24.ter The Honesty Stack
24.quater THE EXIT RECIPE - A/B comparison
- Real-time spectrum
- Preset manager
- I/O meter
- Resizable UI and languages
- Licence and tiers
- Ableton Live — step by step
31.bis Monkey Engineer — free Extension for Ableton - Logic Pro — step by step
- Per-track and master bus workflow
- FAQ — Frequently asked questions
- Support and issue reporting
- What’s new (v1.2)
- Appendix — catalogues and preset parameters
- Basic troubleshooting
1. What MONKEY MASTERING is
MONKEY MASTERING is an all-in-one automatic mastering plugin for macOS and Windows, shipped as VST3 (Mac and Windows), AU (macOS only) and as a Standalone application (Mac and Windows). In one window, and with a single decision on your part, it combines every tool a modern master needs: a 5-band parametric EQ, a compressor with four characters, a limiter with true-peak control, saturation/clipper with oversampling, a de-esser, sidechain, stereo image with Mid/Side, dithering, stem separation and a virtual monitoring system with 21 profiles.
The engine does not replace your judgement. It starts from a professional configuration based on the track type you are processing (kick, vocal, pad, full mix…) and on the music style (Pop, Drill, Techno, Reggaeton, Classical…), and gives you quick, readable controls to fine-tune the rest.
You can use MONKEY MASTERING in three ways:
- Per-track insert while you mix — a fast, musical starting point on every channel.
- Pre-master bus — glue the full mix before final mastering.
- Master Final — final loudness, clipping, limiter, dither and streaming target for release.
And it tells you what it did to your audio. Three tools that go together — the Honesty Stack: THE DAMAGE RECEIPT (what the chain took away, measured), Δ NULL (the processing alone, audible) and THE HONEST NO (the plugin refusing to process a track that already meets the target). See §24.ter.
2. Design philosophy
MONKEY MASTERING has a clear opinion by design. Here is what that means:
- Defaults with judgement. Every track type × style combination loads the settings an experienced engineer would dial in. You do not start from zero.
- One plugin. One decision. Instead of ten plugins in a chain, you pick a track type, a style and a mode. The rest is handled.
- Transparent when it should be, coloured when it helps. Four compression characters, a soft clipper with 4× oversampling and adjustable DRIVE, and style-dependent EQ curves give you character without giving up clarity.
- Real measurement. Loudness measurement conforming to BS.1770-4 / EBU R128, true-peak readout, a PROOF panel with a per-platform verdict, level-matched A/B comparison, real-time spectrum. You never fly blind.
- Your mix, your call. Every automatic decision can be overridden in EXTRAS. The automatic spectral analysis suggests; you decide what gets applied.
- Release-ready. You pick the destination and the plugin sets the loudness target and the true-peak ceiling. The PROOF panel then tells you, with numbers, whether your master meets it.
- The Honesty Stack — three tools, one package. THE DAMAGE RECEIPT shows you what the chain took away from your audio, Δ NULL lets you hear the processing on its own, and THE HONEST NO turns down the job when your track already meets the target. Being able to audit the plugin is a feature, not an add-on. See §24.ter.
3. System requirements
macOS
- macOS 11 Big Sur or later (universal binary)
- Apple Silicon (M1/M2/M3/M4) or 64-bit Intel
- VST3 or AU host + Standalone app
- 4 GB RAM (8 GB recommended)
- 150 MB of free disk space
Windows
- Windows 10 or 11 (64-bit)
- x64 CPU with SSE 4.2 (2012+)
- VST3 host + Standalone app. Note: AU is macOS-only.
- 4 GB RAM (8 GB recommended)
- 150 MB of free disk space
Verified DAWs
| DAW | Minimum version | Format |
|---|---|---|
| Ableton Live | 10.1+ (Live 9 or earlier is not supported — it only hosts VST2) | VST3 |
| Logic Pro / GarageBand | 10.5+ | AU (Mac) |
| Cubase | 10+ | VST3 |
| Studio One | 4.5+ | VST3 |
| REAPER | 6+ | VST3 / AU |
| FL Studio | 20.8+ | VST3 |
| Bitwig Studio | 3+ | VST3 |
4. Installation
macOS (Apple Silicon and Intel)
- Download
MONKEY MASTERING.pkgfrom your Lemon Squeezy purchase email. - Double-click to run the installer. The VST3 goes to
/Library/Audio/Plug-Ins/VST3/and the AU to/Library/Audio/Plug-Ins/Components/. - Manual install alternative: copy
MONKEY MASTERING.vst3to~/Library/Audio/Plug-Ins/VST3/and/orMONKEY MASTERING.componentto~/Library/Audio/Plug-Ins/Components/. - Open your DAW and rescan plugins. MONKEY MASTERING appears under Mastering / Monkey Mastering.
- First launch: paste your licence key → Activate. Done. Still no key? The 14-day trial starts automatically with the complete set of Pro features.
Windows 10/11
- Download
MONKEY MASTERING Setup.exefrom your purchase email. - Run the installer. The VST3 goes to
C:\Program Files\Common Files\VST3\. - Manual install: copy
MONKEY MASTERING.vst3to that folder. - Open your DAW, rescan VST3, activate the licence.
auval) and pluginval by Tracktion at its strictest level (level 10), in VST3 and AU, with and without GUI.Open → confirm, or run xattr -d com.apple.quarantine "/ruta/al/bundle". If it refuses to load a file you copied by hand: System Settings → Privacy and security → Open anyway. You only need to do this once per machine.More info → Run anyway. Once only.5. Getting started
5.1 Where it goes — and how to use it on every track while you mix
MONKEY MASTERING is a mastering plugin that works by measuring. You play your audio, it listens for about 20 seconds and builds its chain from what it actually heard — not from a preset that guesses. Then it tells you, with numbers, whether the result meets the platform you are sending it to.
It is a plugin (VST3 on Mac and Windows, AU on Mac) and it also runs on its own, as an application, with no DAW. You insert it like any other plugin, in one of these two places:
| Where | Set Mode to | What it does there |
|---|---|---|
| The master bus the normal case | MASTER FINAL | Masters your finished mix: the whole chain, plus the platform target and the true-peak ceiling. This is the one you want for release. |
| A single track | TRACK | Cleans up and shapes one element — a vocal, a kick, a bass — before it reaches the mix. |
| A group or stem bus | PRE-MASTER | Middle ground: the track treatment plus stereo width and saturation. |
MASTER FINAL and follow the three phases below. Everything
else on this page is optional.Track by track, while you mix
- Insert MONKEY MASTERING on a channel (a kick, for example).
- Set Mode to
TRACK. - Set Track Type to
KICKand pick the style of the song. - MONKEY MASTERING applies an EQ, compression and saturation recipe specific to a kick and tuned to the style. Fine-tune the knob row (LEVEL / THRESHOLD / RATIO / ATTACK / RELEASE / MIX / CEILING) if you want.
- Repeat for snare, vocal, bass… Keep one instance on the master in
PRE-MASTERorMASTER FINAL.
5.2 Your first master — 3 phases, 6 steps
Three phases that contain six steps. The plugin walks you through them the
first time you open it, and you can repeat that walkthrough whenever you like from the
“...” menu.
What are we mastering?
Pick the Track Type and the Music Style. That is all the context the engine needs to know what is “right” for your material.
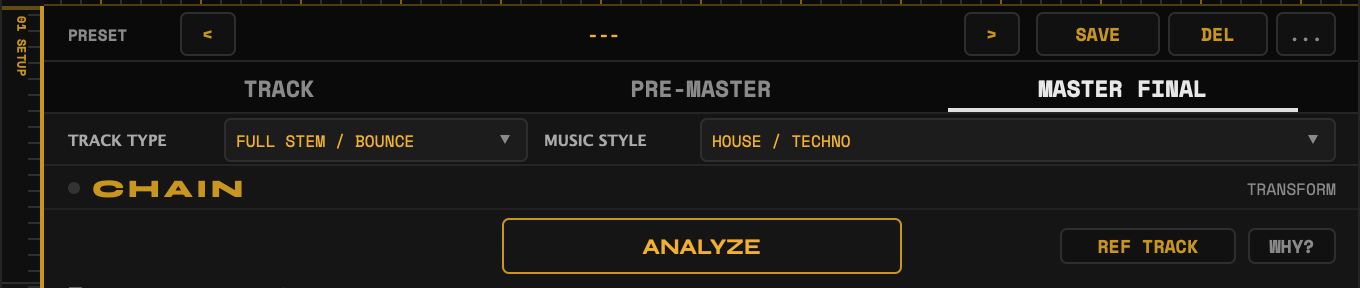
ANALYZE
Play the loudest part of the track and press ANALYZE. Give it about 20 seconds. It is measuring your real audio — the loudest part is the one that will have to deal with the limiter, and that is why it is the part worth measuring.
Applying is automatic
When the analysis ends the whole chain sets itself and the dot on the CHAIN plate stays solid gold. You do not have to press anything.
And if your mix was already fine, it says so instead of processing it. That is the
Honest No: a line in the PROOF panel telling you there was
nothing worth touching. The WHY? button — top
right of the chain, next to REF TRACK — opens the reasons,
explained.

Where is it going?
Pick your destination in PLATFORM. That sets the loudness target and the true-peak ceiling the master has to respect — and it is the question answered by the next step.
No Target and Generic are not platforms, they are shortcuts: No Target touches nothing (use it while you are working) and Generic is a safe middle ground for when you do not yet know where the track will end up.

The verdict
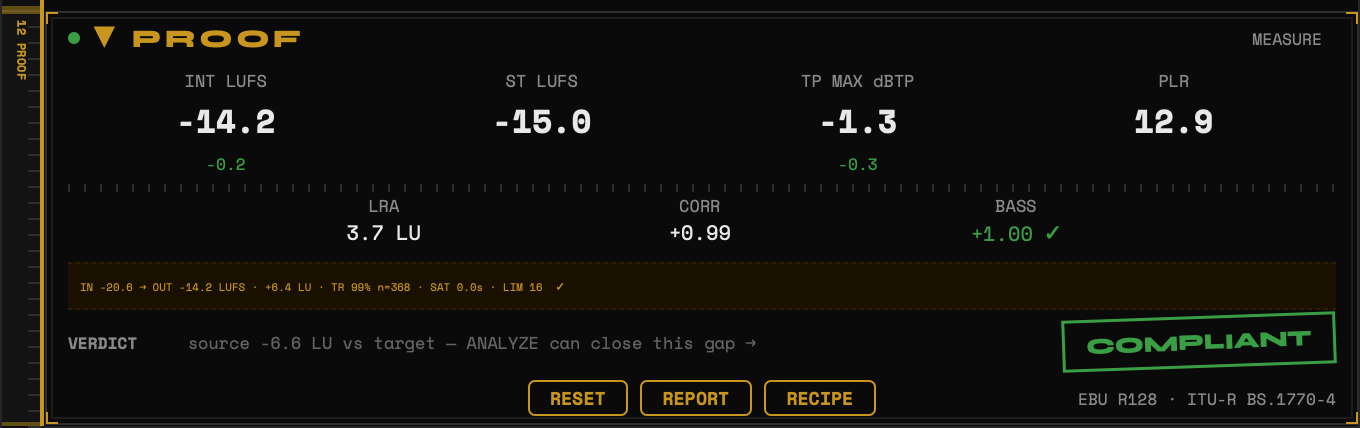
Play the whole track once and read PROOF. The seal on the right is the answer: it reads COMPLIANT, in green, when the master meets the destination you chose. Here green is earned — in this plugin nothing is green for decoration.
| The seal says | Which means |
|---|---|
NO TARGET | You have not picked a platform yet, so there is nothing to measure against. |
MEASURING | Keep listening. Let the track run. |
COMPLIANT | It meets the target and stays under the ceiling. Ready to send. |
OVER TP | True peak is above what the platform allows. |
Δ ±x LU | How far the loudness still is from the target. |
The two small green numbers under the big figures are the distance to the target (loudness) and to the ceiling (true peak) — which is why they only appear under those two.
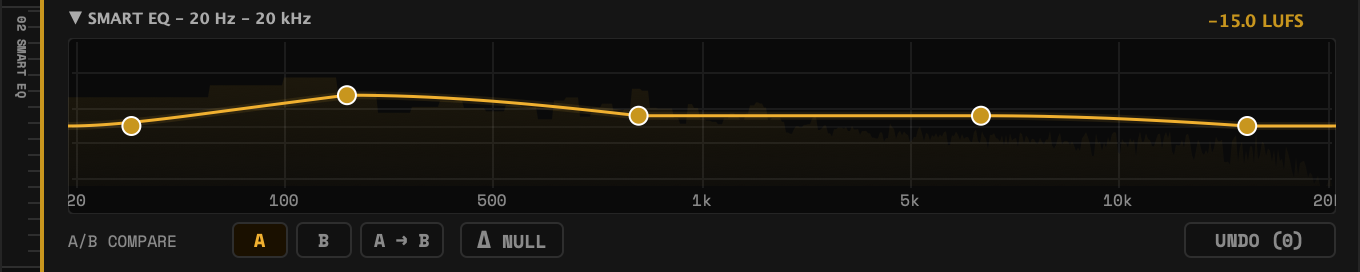
Want to hear exactly what the plugin changed? Δ NULL, in the A/B row under the EQ, plays the difference only: your audio subtracted from the processed signal. If you can barely hear anything, it has barely done anything.
Export
Bounce from your DAW as you always do — the plugin prints exactly what you heard. Or press REC, in the section just above PROOF, to write the file from the plugin itself.
5.3 Key tips
CLIPPER). Dynamics are part of the song.Before you stack many instances
6. The interface, section by section — EXPERT
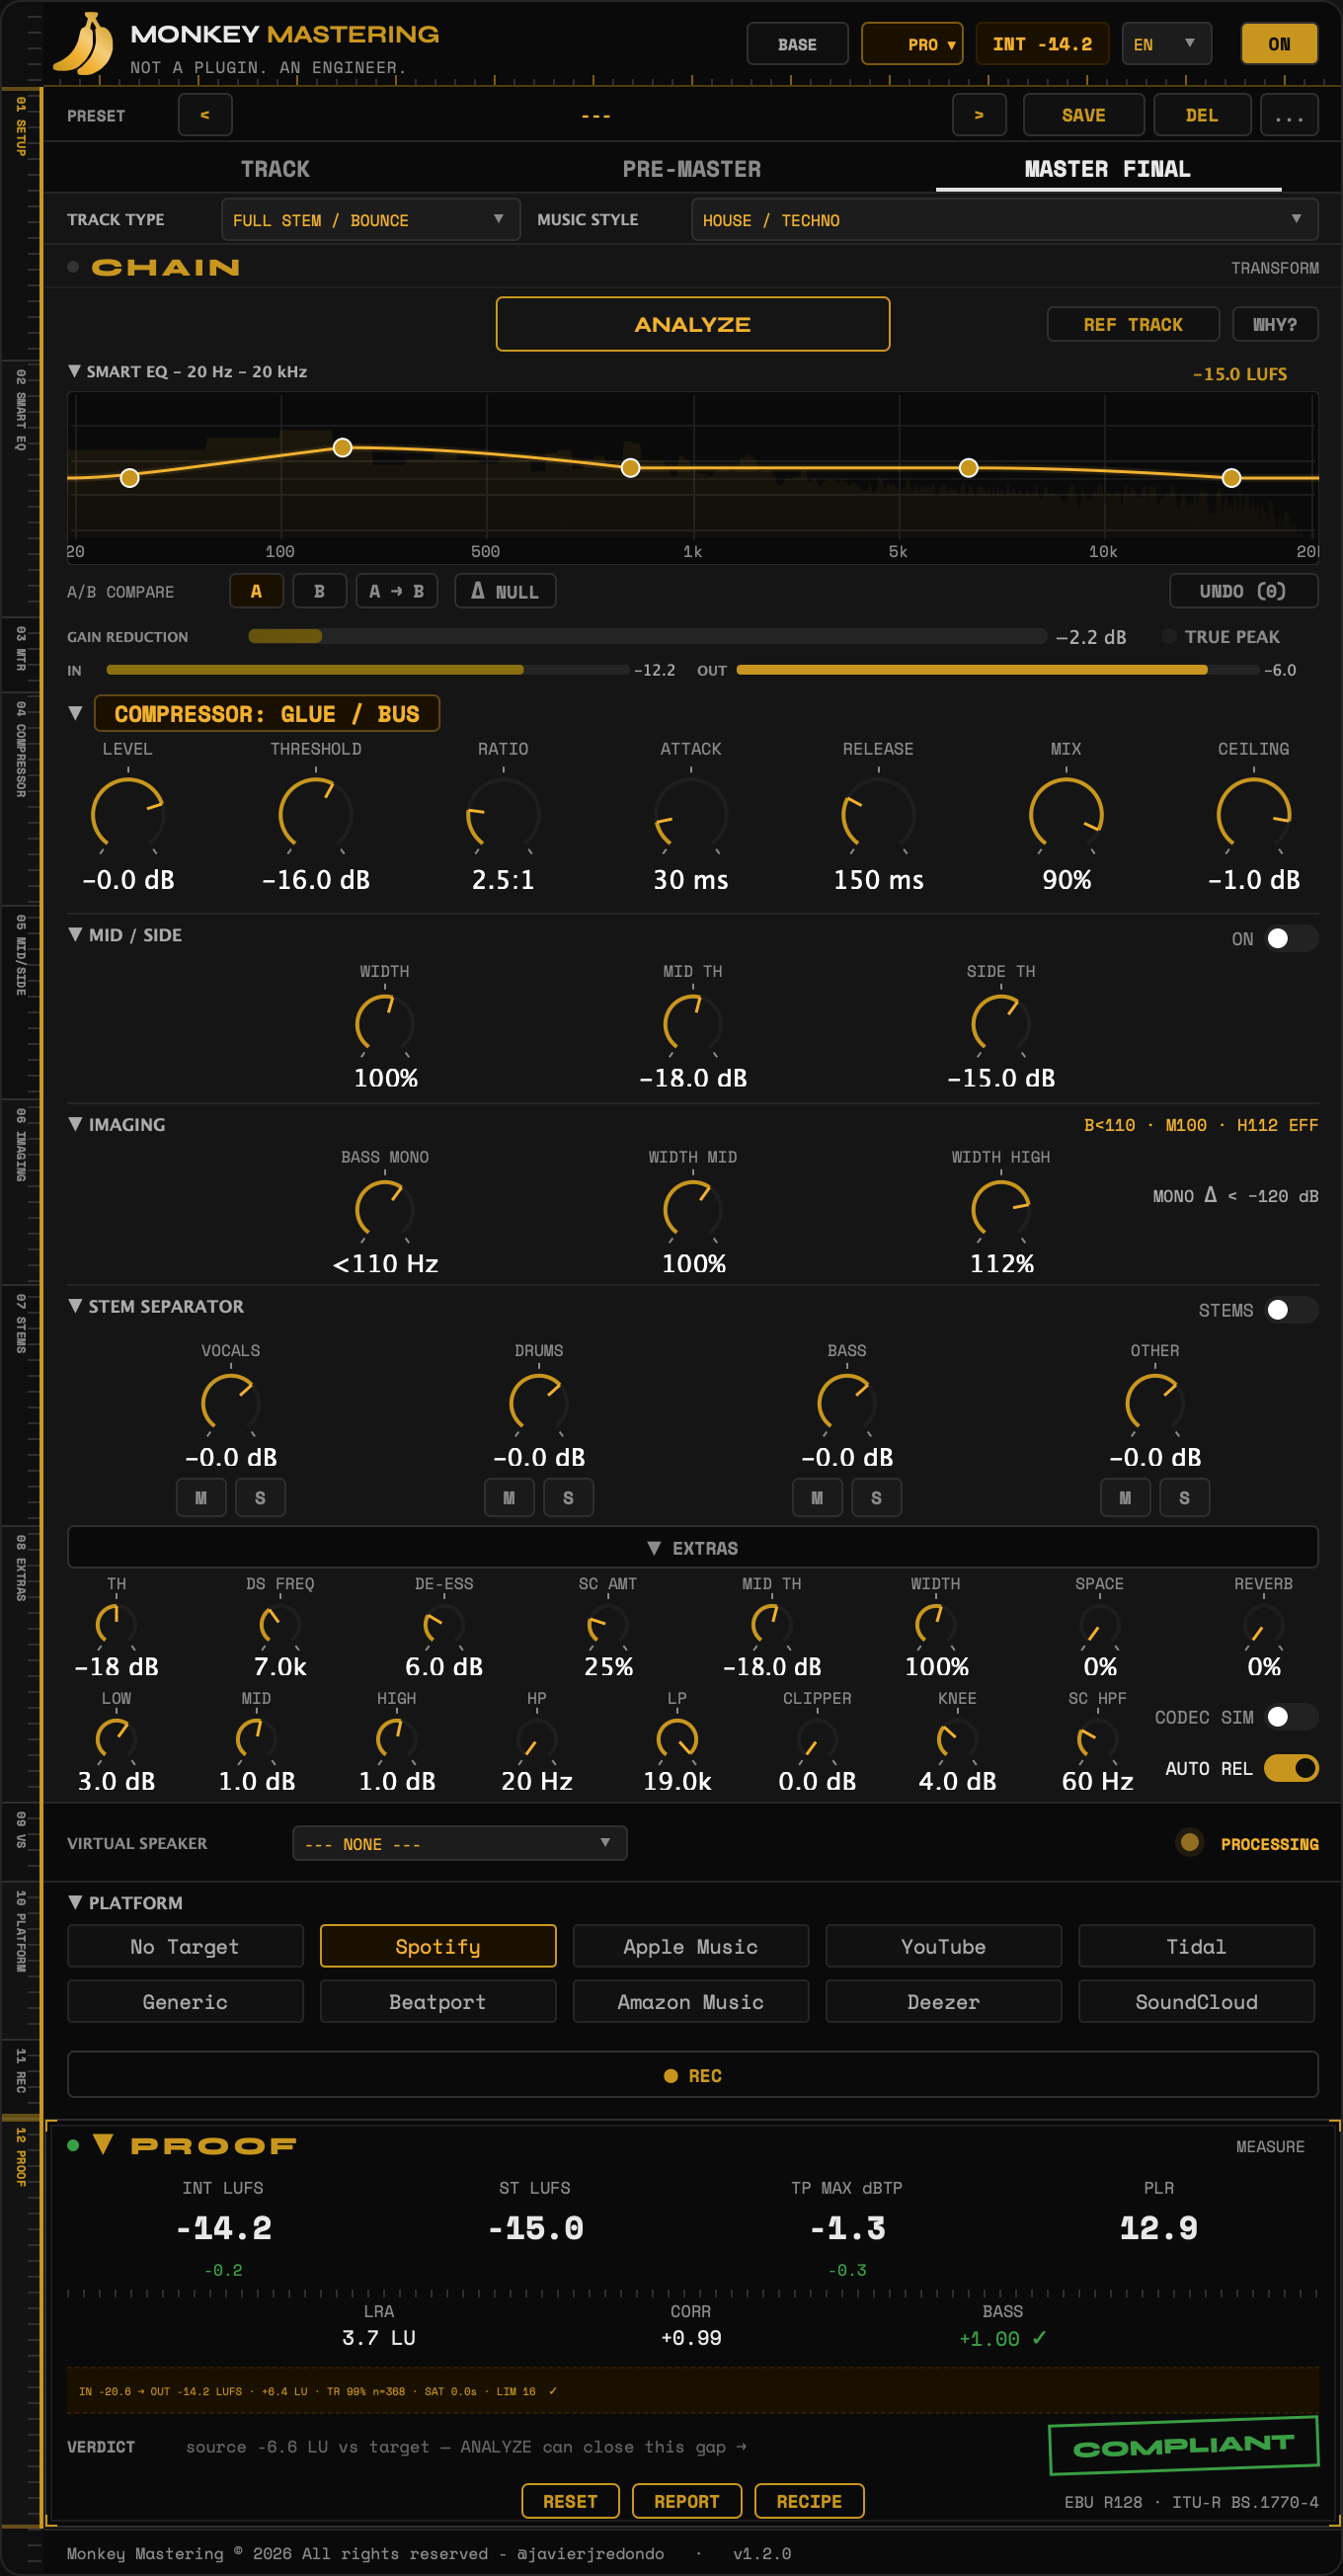
This is the whole plugin, opened in EXPERT — with every section unfolded. Read this chapter once and you know where everything is; BASE (§6.bis) is this same window with most of it folded away.
The window reads top to bottom in numbered sections. The numbering lives on the strip down the left edge, which works as an index and only lists the sections that exist in the active mode. The map that follows is the one for MASTER FINAL, which has twelve; in TRACK and PRE-MASTER DE-ESSER and SIDECHAIN also appear, and PLATFORM, REC and PROOF disappear — the rail rearranges itself, without you touching anything.
Hover over a number — or tap it, if you are on a touch screen — to see what that part of the plugin does. Below the map, each section is explained in detail.
 •HeaderYour view (BASE / EXPERT), your licence, the integrated loudness, the language and the master on/off.
01SETUPPreset, mode, and what you are mastering: track type and music style.
02SMART EQFive bands drawn over your real spectrum. Drag any of them.
03METERSHow hard it is compressing, and the input and output levels.
04COMPRESSORThe compressor. The analysis sets these seven knobs — you can still move them.
05MID/SIDEStereo width, and separate compression for the centre and the sides.
06IMAGINGBass to mono below a frequency, and width per band.
07STEMSSplits the mix into vocals, drums, bass and the rest. Heavy on the computer — see §5.3.
08EXTRASDe-esser, sidechain, filters, clipper and the advanced compressor controls.
09VIRTUAL SPEAKERHear your master as a phone or a laptop would play it. It never reaches the file.
10PLATFORMWhere it goes. Sets the loudness target and the true-peak ceiling.
11RECWrites the result to a file straight from the plugin.
12PROOFThe verdict, measured. COMPLIANT in green means it meets the destination you chose.
•HeaderYour view (BASE / EXPERT), your licence, the integrated loudness, the language and the master on/off.
01SETUPPreset, mode, and what you are mastering: track type and music style.
02SMART EQFive bands drawn over your real spectrum. Drag any of them.
03METERSHow hard it is compressing, and the input and output levels.
04COMPRESSORThe compressor. The analysis sets these seven knobs — you can still move them.
05MID/SIDEStereo width, and separate compression for the centre and the sides.
06IMAGINGBass to mono below a frequency, and width per band.
07STEMSSplits the mix into vocals, drums, bass and the rest. Heavy on the computer — see §5.3.
08EXTRASDe-esser, sidechain, filters, clipper and the advanced compressor controls.
09VIRTUAL SPEAKERHear your master as a phone or a laptop would play it. It never reaches the file.
10PLATFORMWhere it goes. Sets the loudness target and the true-peak ceiling.
11RECWrites the result to a file straight from the plugin.
12PROOFThe verdict, measured. COMPLIANT in green means it meets the destination you chose.
EXPERT view. The twelve sections unfolded and, on the left, the index that numbers them.
< · name · > · SAVE · DEL · ...): it rules over everything below it, because it rewrites it. Then the mode tabs TRACK · PRE-MASTER · MASTER FINAL, and under them the TRACK TYPE (16) and MUSIC STYLE (24) selectors — the row where you tell MONKEY MASTERING “what this is”.A, B, A → B, Δ NULL) row and the UNDObutton, which keeps count of the steps you can undo.GAIN REDUCTION with its dB readout, the TRUE PEAK indicator and the meters IN / OUT.COMPRESSOR: GLUE / BUS). Below it, the main row of seven knobs: LEVEL · THRESHOLD · RATIO · ATTACK · RELEASE · MIX · CEILING. Double-click any knob to return it to its default. LEVEL is the gain that feeds the clipper and the limiter: it is the knob you reach for when the verdict says you are too loud or too quiet (see §12). The five EQ bands (Sub / Low / Mid / High / Air) are not in this row: you edit them by dragging their handles on the EQ display.W 100%, B<110 · M100 · H112 EFF, STEMS OFF) and its ON/OFF.PROCESSINGLED. It never reaches the file.6.bis BASE — the same interface, folded v1.2
BASE is not a second interface. It is the window you have just read about (§6) with most of its sections folded. It hides nothing, disables nothing, switches nothing off and is missing no control — a folded section is one click away from being open, in the same place and in the same order.

W 100%) and its
ON switch still works. Folded is not switched off.
Folding and unfolding a section
Every section header carries a ▶/▼arrow. One click on the header opens the section in place; another click folds it back to a single line. Two things survive the folding, and they are the reason folding is safe:
- The readout stays in view on the header row (
W 100%,B<110 · M100 · H112 EFF,STEMS OFF,GR −2.2 dB): you know what a section is doing without having to open it. - The ON/OFF switch is still in charge. It controls the processing independently of the folding, and switching a section on unfolds it automatically.
What BASE leaves unfolded
Exactly what you need for the six steps in §5.2, and nothing more:
- Open: the PRESETrow, the mode tabs, the Track Type and Music Styleselectors, the CHAIN plate with the big ANALYZE (plus REF TRACK and WHY?), the A/B comparison with Δ NULL and UNDO, the meters, 09 VIRTUAL SPEAKER, the 10 PLATFORM, 11 REC grid and the full 12 PROOF panel.
- Folded: 02 SMART EQ, 04 COMPRESSOR, 05 MID/SIDE, 06 IMAGING, 07 STEM SEPARATOR and 08 EXTRAS — each one on a single line, with its header, its readout and its switch.
Read the two lists together and you have the argument: what stays open is the master; what folds away is the fine-tuning.
Switching view, and what switching view does not do
You switch with the plate in the plugin header or from the preset “...” menu, where BASE and EXPERT are marked with the active view. Switching view does not touch a single audio parameter: it folds and unfolds. Four consequences worth knowing:
- The engine is untouched. Folding is an interface gesture; it does not bypass or simplify any processing. The DSP works exactly the same in both views, and both offer exactly the same features.
- BASE does not force any mode. The TRACK / PRE-MASTER / MASTER FINAL tabs are always there, in both views: BASE cannot take capability away from you.
- The header plate tells you where it takes you, not where you are: in BASE it reads
EXPERTand in EXPERT it readsBASE. The tooltip makes clear which one you are in. - The view is NOT saved with the session. It lives on each machine, together with the rest of your local preferences. Parameters travel with the song; the view travels with you. That is why loading a preset no longer rewrites your interface, and undoing a parameter no longer moves your view. The UI scale lives in the same place (75–150%), next to BASE / EXPERT, About and Tour.
Guided first-run tour
The first time you open MONKEY MASTERING on a machine the plugin asks you first whether you want to start in BASE or in EXPERT — and only then starts the tour, so that the tour explains the interface you chose. The tour has 6 steps, one goal at a time: 1 what are we mastering (Track Type and style) → 2 ANALYZE with the loudest part → 3 the automatic APPLY (the CHAIN LED) → 4 where it goes (PLATFORM) → 5 the verdict (PROOF) → 6 export (REC or bounce). Click anywhere to move on, or use SKIP / ESC to close it — once closed it does not come back.
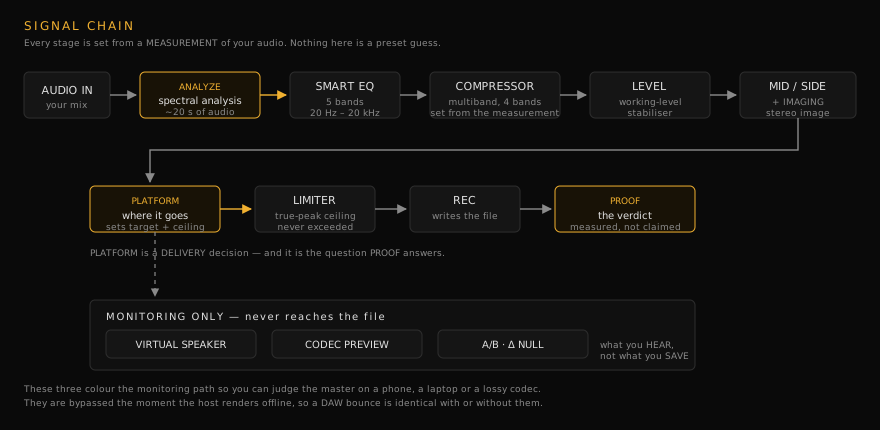
7. Modes and signal chain
MONKEY MASTERING offers three modes. Same plugin, different personality:
| MODE | USE CASE | CHAIN |
|---|---|---|
| TRACK | Individual channels (kick, vocal…) | HP/LP → EQ (track-flavoured) → Dynamics → De-esser → Width |
| PRE-MASTER | Master bus during mixing | HP/LP → EQ → Gentle Glue Comp → MS Width → Gain |
| MASTER FINAL | Release master | HP/LP → EQ → Comp → Clipper → Limiter → Dither |
All three modes respect the Track Type + style + streaming target selection and adapt their recipe accordingly.
8. Track Types — 16 options
The Track Type tells MONKEY MASTERING what you are processing. This choice shapes the EQ curves, the compressor character, the de-esser behaviour and the macro defaults. It lives in 01 SETUP, the first section of the window (§6).
The full list of the 16, grouped by family, is in Appendix 37.1.
FullStem for the master bus and let the style drive the recipe.The Standard tier includes 8 of the 16 track types; Pro unlocks all 16 (see §30).
9. Music styles — 24 options
The style tells MONKEY MASTERING where the song lives. It controls the tonal balance, the target loudness, the bass weight, the air, the compression density and the colour of the saturation.
The full list of the 24 is in Appendix 37.2.
The style affects the initial EQ curve, the compressor attack/release, the saturation drive, the fallback target LUFS and the default stereo width. Changing style without touching anything else can transform the sound radically — try it.
The Standard tier includes 12 of the 24 styles; Pro unlocks all 24 (see §30).
10. PLATFORM — where your master is going
PLATFORM is section 10. Here you pick where the master is going: eight platforms and two utilities, No Target and Generic.
The loudness target and the true-peak ceiling of each plate — the 8 platforms and the 2 utilities — are tabulated in Appendix 37.3.
Picking a destination only moves the limiter ceiling and tells the integrated LUFS meter which reference line to show. It does not touch your EQ, the compressor, the width or IMAGING: the tweaks you made by hand stay where you left them.
No Target is a real OFF. It is not “the style target” nor a club preset dressed up as “none”: with No Target selected, MONKEY MASTERING does not push loudness and does not move the ceiling. It is the option for sculpting the master by ear and picking the destination at the end. If you want a hotter club/DJ master, choose Beatport (−10 LUFS), which is a declared delivery specification.The Standard tier includes 3 platforms (Spotify, Apple Music, YouTube) plus the two utilities, No Target and Generic; Pro unlocks all 8 platforms (see §30).
10.bis Raw export v1.0
The ● REC button in Master Final mode captures the processed audio straight to disk while the host plays. You master the project, press REC, pick the format, start playback and you get a file of the mastered output — with no need to bounce externally from the DAW.
| FORMAT | BIT DEPTH | USE CASE |
|---|---|---|
| WAV 16-bit | 16 | Universal compatibility, CD quality, small files |
| WAV 24-bit | 24 | Mastering standard, preserves the full dynamic range |
| FLAC (lossless) | 24 | Beatport, archiving, compressed (~50% of WAV) |
| MP3 (lossy) v1.0 | — | Quick demo sends, email-sized files, checks on your phone |
RECOMMENDED: pick your target platform in MONKEY MASTERING and then bounce / export from your DAW. It is an offline render: sample-accurate, immune to CPU spikes, and it goes through the complete MONKEY MASTERING chain including the dither.
REC: a quick real-time capture from inside the plugin — press ● REC and then PLAY in the DAW. Perfect for getting a reference file or a client demo in a single pass without setting up an export dialog.
How it works:
- Put the plugin in Master Final mode (the REC button only appears there).
- Press ● REC → pick the format (WAV 16 / WAV 24 / FLAC / MP3 128–320, macOS) → pick the destination file.
- Play the track in your DAW from the start; the plugin records its output to disk in real time.
- When playback ends, press ■ STOP; the file is closed and the buffer is flushed.
11. 5-band parametric EQ v1.0
A fully visible, musical EQ with five bands designed for mastering. On screen it is section 02, SMART EQ – 20 Hz – 20 kHz:
| BAND | TYPE | WHAT IT COVERS |
|---|---|---|
| Sub | Low shelf, 80 Hz (Q 0.707) | Everything below 80 Hz — sub weight and cleanliness |
| Low | Band gain, below 200 Hz | Warmth, mud, body |
| Mid | Band gain, 200 Hz–8 kHz | The whole midrange: presence, snare, vocal body |
| High | Band gain, above 8 kHz | Bite, definition |
| Air | High shelf, 10 kHz (Q 0.707) | Openness, brightness, air |
Each band offers ±12 dB. The initial curves come from the Track Type + style seed; every band can be tweaked live by dragging its handle on the EQ display.
Use the HP / LP cuts in the input stage (before the bands) to remove rumble (< 30 Hz) and ultrasonic artefacts (> 18 kHz).
12. Compression and compression modes
The MONKEY MASTERING compressor offers four character modes. The style preset picks one automatically; you can override it. It is section 04, and its header is a plate showing the active character:
| MODE | CHARACTER | USE CASE |
|---|---|---|
| Glue | Slow, gentle, VCA-style | Full mixes, drum bus, acoustic material |
| Punch | Fast attack, aggressive | Hip-hop, rock drums, dense mixes |
| Transparent | Program-dependent release | Classical, jazz, acoustic, vocals |
| Distorted | Colour + harmonic push | Lo-fi, drill, phonk, metal, aggressive pop |
The amount of compression is set from the main knob row — THRESHOLD, RATIO, ATTACK, RELEASE and MIX — and the Track Type + style seed fills in all five for you. In the EXTRAS area (Pro) you get direct control of the compressor threshold (TH), the knee (KNEE), the detector filter (SC HPF) and the program-dependent release (AUTO REL) — see §19.
12.1 Pro compressor controls v1.1
v1.1 extends the compressor with the four controls every human mastering engineer reaches for. The defaults preserve the previous sound exactly — old sessions load unchanged.
| CONTROL | WHERE | RANGE | WHAT IT DOES |
|---|---|---|---|
MIX | COMP row (between RELEASE and CEILING) | 0–100% (default 100) | Parallel (“New York”) compression: mixes the uncompressed signal back in. 100% = fully compressed (classic behaviour). Lower it to keep the transients without losing density. The same knob governs the multiband compressor mix. |
KNEE | EXTRAS row 2 | 0–12 dB (default 6) | A real quadratic soft knee. 0 dB = hard knee (bit-exact classic behaviour); higher values make the compressor come in more gradually around the threshold. |
AUTO REL | EXTRAS row 2 (toggle) | ON/OFF (default OFF) | Two-stage program-dependent release: fast on transients, slower on sustained material — less pumping without setting the release by hand. |
SC HPF | EXTRAS row 2 | 20–500 Hz (default 20 = off) | High-pass filter on the detector only — it stops low-end energy from pumping the compressor. The audio path is not filtered. |
The four compression modes seed these controls automatically (Glue: knee 8, auto-release, SC HPF 60 Hz · Punch: knee 2, MIX 60%, SC HPF 100 Hz · Transparent: knee 12, auto-release · Distorted: knee 0, fully wet), and ANALYZE also sets all four from the measured crest factor and sub energy.
13. De-esser
A split-band de-esser covering 4–12 kHz (default 7.5 kHz). It switches itself on in exactly two track types: Lead Vocal (7.5 kHz, threshold −16 dB) and Backing Vocals (8 kHz, −18 dB). On any other track type it starts OFF — switch it on by hand if the source is sibilant.
Listen to the sidechain alone in EXTRAS to confirm you are catching esses and not cymbals or breath.
14. Sidechain redesigned v1.0
Classic sidechain ducking — the “pumping” effect where the bass or the pads dip every time the kick hits. In v1.0 the section was simplified to three knobs, all automatable from your DAW:
| KNOB | WHAT IT DOES |
|---|---|
| AMT | Amount — how far the ducking dips. Higher = stronger pumping. |
| ATK | Attack in milliseconds — how fast the ducking bites when the trigger arrives. |
| REL | Release in milliseconds — how fast the signal recovers. Short = tight pumping; long = a long breathing pump. |
The trigger always comes from your DAW’s external sidechain input. Route the kick (or any trigger signal) to MONKEY MASTERING’s sidechain input in your DAW: in Ableton Live, expand the device title bar and pick the source in the sidechain routing selector; in Logic Pro, use the Side Chain menu at the top right of the plugin header.
SC AMT) and the detector high-pass (SC HPF) do not live in this section: they are in 08 EXTRAS PRO — see §19.15. Stereo Width and Mid/Side PRO redesigned v1.0
The Width macro on the main panel controls the stereo image from narrow (50%) through natural (100%) to hyper-wide (140%). MONKEY MASTERING uses Mid/Side processing: it preserves mono compatibility by leaving the mid channel intact and shaping the side channel with EQ and gain.
The dedicated MID/SIDE section (Pro) is section 05 and it was redesigned in v1.0 around three knobs:
W 100%).| KNOB | WHAT IT DOES |
|---|---|
| WIDTH | The section’s stereo width — the mid/side balance applied inside the M/S stage. |
| MID TH | Compression threshold in dB for the centre (mid) channel — kick, bass, lead vocal. Lower = more compression in the centre. |
| SIDE TH | Compression threshold in dB for the sides — reverbs, doubles, wide synths. It compresses the sides independently to keep the width under control without touching the centre. |
The output ceiling is handled by the true-peak limiter and the platform target (§17).
- Styles that benefit from wider sides: Ambient / Cinematic, Trance, R&B / Soul, Pop choruses, EDM drops.
- Styles that want tight mono: Drill, Phonk, Techno Pure, Dembow, Lo-Fi / Chill.
15.bis IMAGING — per-band stereo image PRO v1.2
Master Final only. IMAGING is section 06, between MID/SIDE (05) and STEM SEPARATOR (07), and it works only on the sidechannel, per band. The signal is encoded to Mid/Side once, only the side is processed and the mid passes through intact — which is why the module is mono-safe by construction: the imaging module does not touch your mono sum. The card shows the module’s measured mono delta live (MONO Δ).
| KNOB | RANGE | WHAT IT DOES |
|---|---|---|
| BASS MONO | 20–250 Hz (20 = OFF) | A real high-pass on the side channel below this frequency — 24 dB/oct (4th-order Linkwitz–Riley). The low end stays mono-compatible; the mid is untouched. Watch the PROOF BASS CORR meter rise live when you switch it on. |
| WIDTH MID | 50–130% | Side level only between BASS MONO and 2.5 kHz. |
| WIDTH HIGH | 50–130% | Side level only above 2.5 kHz. |

Position in the chain: after the global WIDTH knob (full-band, which runs first — the two multiply) and before the true-peak limiter. Zero added latency (minimum-phase IIR only). The MID/HIGH split at 2.5 kHz is a complementary 1st-order pair (6 dB/oct slopes) that reconstructs the signal perfectly at 100%. The defaults are entirely neutral: with BASS MONO off and both widths at 100% the module is a hard bypass — old sessions sound identical.
Picking a music style loads a measured starting point (never more than 115% width, and the factory seeds never widen the mids). The per-style seed table is in Appendix 37.5.
If a style seed widens the highs, that same seed returns the global WIDTH to 100% — blind full-band widening is replaced by per-band widening. ANALYZE seeds by measurement, not by faith: BASS MONO is only switched on when the measured correlation below 150 Hz justifies it (otherwise it stays OFF), and no widening is added if your mix is already wide.
B<110 · M100 · H126 EFF, or OFF when everything is neutral.16. Clipper with oversampling 4× OS v1.0
A soft clipper with 4× oversampling (tanh curve, polyphase IIR oversampling) placed before the limiter, active in Master Final. It shaves the peaks musically so the limiter does not pump. A single control: DRIVE (0–12 dB, the CLIPPER knob in the EXTRAS area). At 0 dB the stage is transparent; as you raise DRIVE you push the signal against the curve — from a gentle peak rounding to obvious saturation for lo-fi / drill / phonk.
Latency: about 3 samples from the 4× polyphase IIR oversampling. It is not reported to the host: the plugin reports 0 samples of latency unless the Stem Separator is on (see §22). Three samples is far below a millisecond and does not shift your timeline audibly.
17. True-Peak Limiter
Final stage. A brick-wall limiter with look-ahead and true-peak detection per ITU BS.1770. The ceiling follows the streaming target and, since v1.0, the limiter keeps a 0.3 dB true-peak safety margin under the platform ceiling — extra insurance against inter-sample overshoots when the platform re-encodes your master to a lossy codec. Use LEVEL to push the signal into the limiter, not the ceiling.
18. Dithering
Active only in MASTER FINAL. TPDF (Triangular Probability Density Function) dither applied at the output when bit-depth reduction happens (24 → 16 or 16 → 16 for streaming). Inaudible on modern material, mathematically correct for preserving resolution in quiet tails.
19. EXTRAS — the expert area PRO two rows v1.2
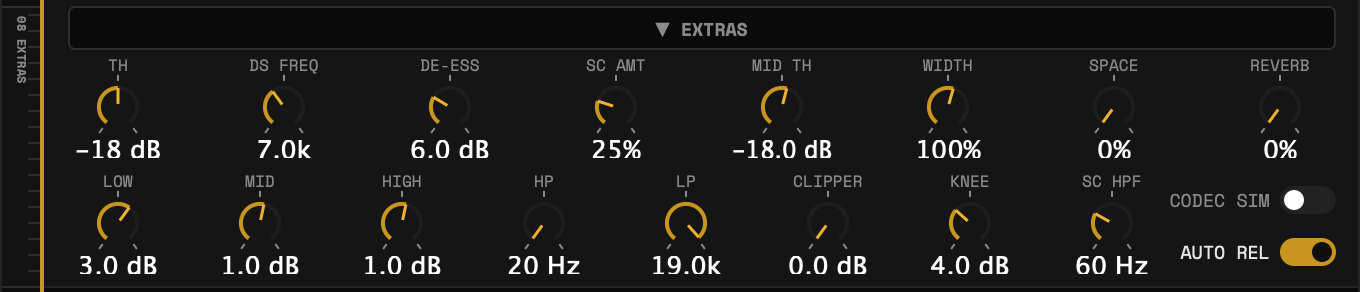
EXTRAS is section 08 and it exposes the internal parameters the MONKEY MASTERING engine normally decides for you, in two rows:
| ROW | CONTROLS |
|---|---|
| Row 1 | TH (compressor threshold) · DS FREQ (de-esser frequency) · DE-ESS (de-esser amount) · SC AMT (sidechain amount) · MID TH (mid-channel compression threshold) · WIDTH (stereo width) · SPACE · REVERB |
| Row 2 | LOW · MID · HIGH (EQ band gains) · HP · LP (high-pass / low-pass cutoffs) · CLIPPER (clipper drive) · KNEE (real compressor soft knee, 0–12 dB) · SC HPF (compressor detector high-pass, 20–500 Hz), plus the CODEC SIM and AUTO REL toggles (two-stage program-dependent release) — see §12.1 |
Use the EXTRAS area when the automatic result covers 95% of the way and you want to push that last 5%. Leave it folded when you want speed.
20. Reference Track PRO
Load a commercial track you want your master to sit next to. MONKEY MASTERING analyses its spectral balance, its loudness and its dynamic range, and offers a match button that biases the EQ curve and the target LUFS towards the reference.
You get the most out of it with a reference from the same style, ideally a release from the same platform you are targeting.
21. Automatic spectral analysis v1.0
Press ANALYZE on a representative section (chorus, drop, the densest part). MONKEY MASTERING listens and suggests:
- The most likely Track Type (FullStem, Kick, Vocal…) PRO.
- The closest music style PRO.
- EQ band offsets to rebalance.
- Compression amount (threshold, ratio, knee, MIX and the detector filter).
- A width recommendation.
- A loudness target.
APPLY is automatic v1.2: when the analysis ends, the chain applies itself and the CHAIN LED stays solid gold — unless your track already meets the target, in which case MONKEY MASTERING says so instead of processing (the Honest No). After that you can fine-tune individual modules section by section, and the internal parameters from EXTRAS.
22. Stem Separator PRO

Real-time separation of the incoming stereo mix into four soft-stems: Drums, Bass, Vocals, Other. Technology: 4096-point FFT with a 1024-sample hop (75% overlap) + Harmonic/Percussive Source Separation + Mid/Side masking. The 5120 samples of latency below are one FFT window plus one hop — they are not the window size.
- Latency: 5120 samples (~116 ms @ 44.1 kHz) with the Stem Separator ON — reported to the host, which compensates automatically. Off, the plugin reports 0 samples. Those are the only two values MONKEY MASTERING ever reports.
- CPU: moderate. Switch it off if you do not need it.
- Use it to send different saturation / EQ curves to the four soft-stems inside EXTRAS, or to quickly remix / rebalance a finished mix.
23. Virtual Speaker section 09
Monitoring emulation of 21 playback systems. Virtual Speaker is monitoring only — it does not colour the bounce, and the plugin leaves it out automatically as soon as the host renders offline. It occupies section 09. It is what you check before deciding on delivery, and it sits apart from the processing sections because it never reaches the file.
The 21 profiles, by category, and what each headphone-class profile simulates are listed in Appendix 37.4.
Every profile — headphones included — is a generic class curve (frequency response, imaging and small-speaker compression), never the simulation of a specific commercial model.
Cycle through four profiles while the master plays. If the bass disappears on Earbuds Premium, your sub is tilted too far towards 40 Hz. If the vocal turns harsh on the TV, take 1 dB off 2–4 kHz.
24. LUFS meter
Loudness measurement conforming to ITU BS.1770-4:
- Momentary (M): 400 ms window, instantaneous loudness perception.
- Short-term (S): 3 s sliding window, ideal for comparing chorus with chorus.
- Integrated (I): running average since playback started. This is the number that matters for streaming.
- Loudness Range (LRA): the dynamic range of your master in LU. Pop lives around 5–8 LU; classical between 12–20 LU.
Press RESET to start a fresh integrated measurement from the beginning of the song.
In MASTER FINAL mode the loudness engine also feeds the PROOF panel — the complete pre-release verification described in the next section.
24.bis The PROOF panel — verify your master v1.0
The PROOF panel is section 12, the last one, in MASTER FINAL mode — directly below 11 REC and one section below 10 PLATFORM, which is the destination it is checking against. It is a loudness measurement suite conforming to ITU-R BS.1770-4 / EBU R128 — the same standards broadcasters and streaming platforms use — and it answers one question in one glance: is this master ready for the platform I selected?
The implementation passes the official EBU Tech 3341 test vectors, the reference signals the EBU publishes for validating loudness meters. In other words: the numbers you read here are the numbers a broadcast-grade meter would read.
What each number means (in plain language)
| METRIC | UNIT | WHAT IT TELLS YOU |
|---|---|---|
| INTEGRATED | LUFS | The average loudness of everything played since the last RESET — the whole song, intro and breakdown included. This is the number streaming platforms look at when they decide whether to turn your track down. It only means something after a full playthrough: measure a chorus loop and you will get a flattering lie. |
| SHORT-TERM | LUFS | The loudness of the last 3 seconds. It moves with the song — watch it to compare your drop against your verse, or your chorus against a reference track. It is not what platforms normalise on. |
| MAX TRUE PEAK | dBTP | The highest peak of the signal including inter-sample peaks, measured with 4× oversampling. Digital samples are snapshots; the real analogue waveform between two samples can swing higher than either of them. Ordinary peak meters miss that; true peak catches it. If it exceeds the platform ceiling (typically −1.0 dBTP), your master can distort after the platform’s lossy encoding or on cheap converters. |
| PLR | dB | Peak-to-Loudness Ratio: Max True Peak minus integrated loudness. A quick read on how punchy vs how dense your master is. High PLR (say 12+) = dynamic, breathing material; low PLR (6–8) = dense, heavily limited modern master. Neither is “wrong” — but if your PLR is 4, you have crushed the life out of the track. |
| LRA | LU | Loudness Range: how much the loudness varies across the song’s sections — quiet verse vs loud chorus. Pop/EDM typically lives around 3–8 LU; acoustic and cinematic material 8–15+ LU. A very low LRA means every section hits equally hard (which can be intentional); a very high LRA on a club track means the quiet parts will disappear on the dancefloor. |
| CORRELATION | −1…+1 | How compatible your stereo image is with mono playback. Near +1: left and right agree — safe everywhere. Around 0: very wide material. Negative: left and right are fighting — parts of your mix (usually bass or vocal) will cancel and vanish on mono systems: phones, Bluetooth speakers, many club PAs. If you see sustained negative correlation, narrow the Width. |
The verdict
At the very bottom, next to the VERDICTline, the panel stamps a seal with the verdict against the platform you selected:
- NO TARGET (gold): you have not picked a destination, so there is nothing to judge against. Go down to PLATFORM and choose one.
- MEASURING (gold): there is no valid integrated measurement yet. Press RESET and play the whole track.
- COMPLIANT (green): integrated loudness is within ±1 LU of the target and max true peak is at or under the platform ceiling. Export with confidence.
- Δ +2.3 LU (red): true peak is fine, but the integrated loudness deviates from the target and the seal prints how many LU (“+2.3 LU” = you are 2.3 LU louder than the target). Adjust LEVEL.
- OVER TP +0.4 (red): true peak overshoots the platform ceiling, and the seal prints the overshoot. Fix this one before release: it is the difference between a clean and a crunchy stream.
Step by step: verify your master before release
- Put MONKEY MASTERING in MASTER FINAL mode on the master bus and pick your destination in PLATFORM (section 10).
- Rewind the DAW to the very start of the song.
- Press RESET on the PROOF panel. All measurements restart from zero.
- Play the whole track once, start to finish, without stopping, looping or skipping. Integrated LUFS, LRA and Max True Peak are running measurements — they need the complete song to be honest.
- When playback ends, read the verdict. A green COMPLIANT seal → bounce/export from your DAW. A red seal → apply the fix (usually a small LEVEL adjustment for the LU deviation; TP is handled by the limiter ceiling, so a red TP usually means something after MONKEY MASTERING is touching the signal), then RESET and play through again.
24.ter The Honesty Stack — what the plugin admits v1.1
Three features exist for one purpose only: to let you audit what MONKEY MASTERING did to your audio, including the part you might not have wanted.
| TOOL | THE QUESTION IT ANSWERS | WHERE IT IS |
|---|---|---|
| THE DAMAGE RECEIPT | What did the chain take away from your audio? — LU gained, transient retention (TR %), seconds of clipper saturation, hard limiting events. | A row under the meters in the PROOF panel, and in the MASTER REPORT PNG. |
| Δ NULL | What exactly did the chain add or remove? — processed minus dry, latency-compensated. | The Δ NULL button. Monitoring only, never exported. |
| THE HONEST NO | Is the plugin really needed here? — if the source already meets the target, it says so instead of processing. | The verdict row after ANALYZE, plus the WHY? button. |
Δ NULL — listen to the difference, not the result
The Δ NULL button replaces the monitored output with processed minus dry. What you hear is exactly and only what the plugin added or removed: the EQ move, the compression, the saturation, the limiter’s gain work. If Δ NULL is silent, the chain is doing nothing. If it sounds like distortion, it is distortion. It affects monitoring only — never the export.
THE DAMAGE RECEIPT — what the chain took away from your audio
A row under the meters that prints what the chain took away from your audio, measured against a second BS.1770 meter fed with the raw input: loudness gained, dynamic range lost, samples pushed into saturation, hard limiting events. The TR % figure is measured transient retention — the median loss per hit between the pre-limiter take and the master, with n = the number of hits measured. Below 8 hits it falls back to a PLR-ratio estimate and says so, labelled (PLR est.): an estimate is never dressed up as a measurement. Play the track to populate it.
THE HONEST NO — “you do not need me here”
When ANALYZE finishes and your track already meets the selected target, MONKEY MASTERING refuses to process it instead of adding gain to look busy. Press WHY? to see the measured reasons. That is why APPLY sometimes looks like it did nothing: it did do something — it decided not to.
24.quater THE EXIT RECIPE — your master in plain text v1.1
Open the PROOF panel in Master Final and a RECIPE button appears next to RESET and REPORT (it is also in the “...” menu as Export Exit Recipe...). It writes a Markdown file (.md) that describes, in plain language and with exact numbers, everything the plugin is doing to your audio at that moment — so that this master can be rebuilt with any EQ, compressor and limiter on the market.
| SECTION | WHAT IT CONTAINS |
|---|---|
| 0 · What this is | Why the file exists: no lock-in, no proprietary format. |
| 1 · Session context | Track type, music style, compressor character, target platform (LUFS + dBTP ceiling), preset, mode, sample rate, tier. |
| 2 · Signal chain, in order | Every stage with its real values, in the order the audio meets them. |
| 3 · What is NOT in your master | The monitoring-only stages (Virtual Speaker, Δ NULL, codec preview) — explicitly excluded. |
| 4 · Measured results | The BS.1770-4 / EBU R128 readout: integrated, short-term, max true peak, PLR, LRA, correlation. |
| 5 · The Damage Receipt | What the chain took away from your audio, so you can aim at the same receipt with other tools. |
| 6 · Quick recipe for any DAW | A numbered rebuild list you can follow with stock plugins. |
| 7 · Machine data (JSON) | Every parameter, in deterministic order, under the schema monkey.exitRecipe/1. |
25. A/B comparison
Instant, loudness-compensated A/B between the processed and the dry signal. MONKEY MASTERING compensates the loudness so that you judge character, not level — an honest comparison, because “louder” always sounds “better” for the first three seconds. Essential for honest decisions.
Two memory slots, A and B. Save the current settings to A, tweak, save to B, compare.
26. Real-time spectrum
A real-time FFT analyser (2048 points) of the input signal, overlaid on the EQ display, scaled from −80 to −10 dB: you see what is entering the chain while you adjust the EQ.
27. Preset manager
MONKEY MASTERING ships with 32 factory presets (including the new Beatport Ready in v1.0). You can load them with the < >arrows, or use the name label to open a searchable list.
Factory presets
Available in every tier (Standard + Pro). Modifications to factory presets live in memory only — they are not written to the factory file. Reload the preset to restore its original values. See §37 Factory preset reference for the full list.
User presets PRO
Pro users can save, delete, rename, import and export their own presets. A saved preset captures the complete plugin state: Track Type, Music Style, streaming target, Comp Mode, EQ gains, threshold / ratio / attack / release, Mid/Side, sidechain amount, the EXTRAS parameters and every active module.
| ACTION | HOW |
|---|---|
| Save as a new preset | Press SAVE → type a name → OK. It saves the current state to disk as a user preset. |
| Delete a user preset | Select the preset in the list → press DEL. Factory presets cannot be deleted. |
| Export a preset to a file | Press the ... → Export current preset → pick a destination. It saves as a portable .mmpreset JSON. |
| Import a preset from a file | Press the ... menu → Import preset → pick a .mmpreset. |
User presets are stored in:
macOS:   ~/Library/Application Support/MONKEY MASTERING/Presets/
Windows: %APPDATA%\MONKEY MASTERING\Presets\
.mmpreset files are plain JSON — you can email them, upload them to Discord, version them with git, or include them in a project template.28. I/O meter
Stereo input and output meters with peak hold. Use them to confirm that your signal enters MONKEY MASTERING with enough headroom (recommended: peaks around −6 dBFS) and to watch the output climb towards the ceiling.
29. Resizable UI and languages
UI scale is a four-step setting in the “...” preset menu: 75% · 100% · 125% · 150%. The window is not free-resizable by dragging — the fixed steps are what keep the layout pixel-correct. Change the UI language from the header menu. Since v1.0 both settings — UI language and UI scale — are remembered across sessions and hosts: set them once, keep them everywhere. Above 125% the PROOF panel folds to its compact form automatically.
Where each preference lives. The parameters travel with the song, inside your DAW project. The view preferences — scale, BASE / EXPERT and the PROOF folding — travel with you: they are saved on each machine: loading a preset does not rewrite your interface, and the scale stays on the computer you work from.
The interface and every tooltip follow that language: hover any control for a one-line explanation.
30. Licence and tiers
| TIER | INCLUDES | UPDATES | SUPPORT |
|---|---|---|---|
| TRIAL | Full Pro feature set for 14 days | — | Community |
| STANDARD | 8 Track Types · 12 music styles · 3 platforms (Spotify, Apple Music, YouTube) + the No Target and Generic utilities + EQ + Comp + Clipper + Limiter + Dither + A/B + LUFS + PROOF + spectrum + ANALYZE (manual type/style) + REC WAV 16-bit | Conformity (fixes, security, OS/DAW) | |
| PRO | 16 Track Types · 24 music styles · all 8 platforms plus Stem Separator, Mid/Side, Reference Match, user presets, raw REC export (WAV 24-bit / FLAC / MP3), metadata editor, adaptive analysis (automatic type/style detection) and the EXTRAS area | Conformity + new features |
One purchase = one licence = up to two simultaneous activations (your laptop + your studio machine). To move the licence to another computer, press DEACTIVATE in the plugin, on the machine you are leaving behind (§30.3, step 4). If that is not possible — the old machine is sold, broken or already wiped — write to support@monkeymastering.com from the address you bought with and we will free the activation for you. You never lose a machine you have paid for.
30.1 Tier badge and activation dialog
The badge in the header (top right, between the BASE / EXPERT view plate and the INT loudness readout) is the licence tier badge: TRIAL, STANDARD or PRO — always gold. Green and red are exclusive to the PROOF verdict, so the badge never changes colour: only the word inside it changes. The outlined border and the small ▾ on the right show that the badge is interactive.
- Click the badge to open the Activate Licensedialog. Paste your key and press ACTIVATE; the badge switches to STANDARD or PRO instantly.
- For STANDARD / PRO already active, the same dialog shows DEACTIVATE (frees one of the two simultaneous seats so you can move the licence to another machine) or Cancel.
- Hover any control in the plugin to see a descriptive tooltip (output level, threshold, platform, A/B, etc.). The UI is covered with tooltips as contextual reference.
30.2 No expiry — offline licence forever
Your licence does not expire, and the plugin does not need the internet to keep working. It is summarised inside the plugin itself, under the OFFLINE FOREVERheading, in the About dialog (preset “...” menu → About):
- No expiry date. The build you install today processes audio forever.
- No iLok, no dongle. Activation is a licence key, nothing else.
- No subscription. One purchase, permanently yours.
- No periodic online reauthorisation. After the single activation the plugin never “calls home” again; your studio machine can stay offline for years.
30.3 When the trial ends — and how to activate
- Buy a licence at
monkeymastering.com. The key arrives by email from Lemon Squeezy. - Open the plugin on any track and click the tier badge in the header (the gold TRIAL pill with the ▾ chevron).
- Paste the key → ACTIVATE. You need an internet connection for this step only. The badge stops reading TRIAL and turns to STANDARD or PRO, and processing resumes immediately.
- Changing machines? Click the badge again → DEACTIVATE to free one of your two seats, and activate on the new computer with the same key. If the old machine no longer exists and you cannot press DEACTIVATE on it, write to
support@monkeymastering.comand we will free the activation.
~/Library/Application Support/MONKEY MASTERING/ (macOS) and %APPDATA%\MONKEY MASTERING\ (Windows). Deleting the DAW project or reinstalling the plugin does not affect your licence.30.4 Going from STANDARD to PRO
You can upgrade at any time, and you only pay the difference between the two editions — never the full PRO price a second time. Write to support@monkeymastering.com from the address you bought with and we will send you the upgrade link.
There is nothing to download and nothing to reinstall. It is the same plugin you already have: the edition is decided by the key, at the moment you activate. So the whole upgrade is a single step:
- Click the tier badge (it now reads STANDARD).
- Paste the new key and press ACTIVATE.
- The badge turns to PRO and every PRO control — EXTRAS, Mid/Side, IMAGING, Space/Reverb, Stem Separator, reference matching, your own presets, 24-bit/FLAC/MP3 export — unlocks in the same session, without closing the plugin.
Your projects, sessions, presets and settings are untouched. The new key comes with its own two activations, so repeat step 2 on your second computer.
30.5 If you lose your key
Nothing is lost, and a computer that is already activated keeps working: the plugin never asks for the key again.
- Your key is in your purchase email. Search your inbox — and your spam and promotions folders too — for “Monkey Mastering” or “Lemon Squeezy” (the sender is our payment provider).
- If checkout took you to the thank-you page, the key was shown there too, with a button to copy it.
- Still nothing? Write to
support@monkeymastering.comfrom the address you used at checkout, or quote your order number, and we will send it again.
The plugin stores your licence locally, in a protected file, but it never shows you the key again — so the place to look for it is your purchase email, not the plugin.
31. Ableton Live — step by step
- Preferences → Plug-Ins → VST3 folder → add the folder above if it is custom.
- Click Rescan.
- Browser → Plug-Ins → VST3 → Monkey Mastering.
- Drag it onto a channel.
- Set Mode = TRACK, select Track Type + style.
- Drag MONKEY MASTERING onto the Master.
- Mode = MASTER FINAL, Track Type = FullStem, pick style + streaming target.
- Play the loudest section and wait for the integrated LUFS to settle.
- File → Export Audio/Video.
- Rendered Track = Master.
- Sample Rate = 44.1 kHz (streaming) or 48 kHz (video).
- Bit Depth = 16 bit (if you are rendering the final WAV for Spotify) — MONKEY MASTERING’s dither engages automatically.
- Normalize = OFF.
31.bis Monkey Engineer — free Extension for Ableton Live v1.0
Monkey Engineer is a free companion Extension for Ableton Live that automates the boring, error-prone part of preparing a mastering session — so the plugin can do its job on a properly prepared set.
Requirements
- Ableton Live 12.4.5 beta or later.
- Extensions enabled in Live’s settings (Live’s Extensions platform is currently in beta and its API may change between Live versions).
- MONKEY MASTERING installed as VST3.
What it does
| FEATURE | WHAT IT DOES |
|---|---|
| Guided master-chain setup | It guides you to insert MONKEY MASTERING on the Master track and then auto-configures it — mode, gain staging, position in the chain — exactly as §33 of this manual recommends. |
| Set readiness check | It scans the set for the classic pre-master mistakes: forgotten solo buttons, rival limiters sitting after MONKEY MASTERING in the chain, a master fader off 0 dB, and similar traps that silently ruin a master. |
| Per-track headroom check | It uses an offline render to measure the real level of every track and flags the channels that leave too little headroom before reaching the master bus. |
monkeymastering.com.32. Logic Pro — step by step
- Logic Pro → Settings → Plug-in Manager.
- Look for Monkey Mastering; the status must be OK.
- Channel strip → Audio FX → Audio Units → Monkey Mastering → Stereo.
- Mode = TRACK, pick Track Type + style.
- Master channel (Stereo Out) → Audio FX slot → Audio Units → Monkey Mastering.
- Mode = MASTER FINAL, FullStem, style, streaming target.
- File → Bounce → Project or Section.
- PCM → WAV → 16-bit if it is final for streaming.
- Normalize = OFF.
- Confirm the bounce goes through MONKEY MASTERING (insert on Stereo Out).
33. Per-track and master bus workflow
Recommended workflow for a complete song:
- Mix: balance levels, pan, fix phase, remove mud, place reverbs.
- MONKEY MASTERING per track on the key channels (kick, snare, bass, lead vocal, pad). Mode = TRACK. Specific Track Type. A consistent style across every instance.
- MONKEY MASTERING pre-master on the master bus. Mode = PRE-MASTER, FullStem. Leave 3–6 dB of headroom at the output.
- Re-mix. Check that your faders still make sense with MONKEY MASTERING printing glue on the master. Often the bass comes down 1 dB and the vocal goes up 0.5 dB.
- Final master. Switch the pre-master instance to MASTER FINAL. Pick the destination in PLATFORM. A/B against the dry mix and verify afterwards with the PROOF panel: RESET → full playthrough → green COMPLIANT seal (§24.bis).
- Check the translation. Cycling through Virtual Speaker profiles (Earbuds Premium, Car, Flat TV, Open-Back Headphones) confirms the master holds up everywhere.
- Bounce. Export to 16-bit WAV / 44.1 kHz for Spotify/Apple Music/Tidal. 24-bit for mastering archives / CD.
34. FAQ — Frequently asked questions
Q. Should I use MONKEY MASTERING instead of my mastering engineer?
A. If you already work with an engineer you trust, keep doing that for the important releases. MONKEY MASTERING is meant for producers who master their own music, for fast iteration, for rough masters before sending them to the engineer, and for productions where a human master is not in the budget.
Q. Is MONKEY MASTERING a clone of another plugin?
A. No. MONKEY MASTERING’s Track Type × style matrix, the Stem Separator, the 21-profile Virtual Speaker and the 32 factory presets define its own workflow.
Q. Can I use MONKEY MASTERING on every channel of my mix?
A. Yes, in TRACK mode. That is one of the intended uses.
Q. Why is the limiter pumping on my drop?
A. You are pushing too much level into the limiter. Back off LEVEL by 1–2 dB, or raise the clipper DRIVE a little so the soft clipper shaves the peaks before they reach the limiter. If it starts to sound harsh, bring DRIVE back down.
Q. Why does my master sound quieter on Spotify than what I printed?
A. Spotify normalises to −14 LUFS. If you printed at −9 LUFS, Spotify turns you down by 5 dB. Master to the target.
Q. Virtual Speaker makes my mix sound dull. Is that normal?
A. Yes — that is the point. Virtual Speaker simulates how listeners hear your master on real devices. Switch it off before exporting; it is monitoring only.
Q. Will MONKEY MASTERING replace my EQ, compressor, limiter and de-esser?
A. For the mastering stage, yes, that is the design. While mixing, keep your favourite surgical EQ and your character compressors. MONKEY MASTERING on the master bus is the finisher.
Q. Can I use MONKEY MASTERING offline?
A. Yes, forever, after the single activation. There is no iLok, no subscription, no periodic online reauthorisation. You only go online again to release a seat and move the licence to another machine.
Q. How long does the trial last?
A. 14 days with the complete set of Pro features. When it ends, the plugin stops processing audio: the signal passes through unprocessed until you activate a key. Your presets and projects are untouched. Trial exports carry a periodic level mark (see §30.2).
Q. Does the plugin expire at some point?
A. No. A licensed build never stops working — no expiry date and no periodic online check. (An unactivated trial does stop processing after 14 days — that is a different mechanism, see §30.3.)
Q. How do I know my master is really ready for Spotify?
A. Use the PROOF panel (§24.bis): pick the destination in PLATFORM, press RESET, play the whole track once and wait for the green COMPLIANT seal — integrated loudness within ±1 LU of the target and true peak at or under the platform ceiling.
Q. The sidechain knobs do nothing. Why?
A. Since v1.0 the sidechain is always triggered from your DAW’s external sidechain input . Route the kick (or another trigger) to MONKEY MASTERING’s sidechain input in the DAW — see §14.
Q. On how many computers can I activate it?
A. Two. Usually your laptop + your main studio machine. To move to another computer, press DEACTIVATE in the plugin, on the machine you are leaving behind; if that machine no longer exists, write to support@monkeymastering.com and we will free the activation (see §30.3).
Q. I bought STANDARD. Can I move to PRO later?
A. Yes, paying only the difference between the two editions. Write to support@monkeymastering.com from the address you bought with. There is nothing to download and nothing to reinstall — you paste the new key over the one you have and the badge turns to PRO in the same session (see §30.4).
Q. I have lost my licence key.
A. It is in your purchase email — look in spam and promotions too, the sender is our payment provider. If it really does not turn up, write to support@monkeymastering.com and we will send it again. In the meantime, a computer that is already activated keeps working (see §30.5).
Q. Does MONKEY MASTERING support AAX (Pro Tools)?
A. No. AAX support is under evaluation for future releases. In v1.2 you have VST3 (Mac/Windows), AU (macOS only) and Standalone (Mac/Windows).
Q. My DAW reports ~116 ms of latency when the Stem Separator is active. Why?
A. Because the Stem Separator needs a 4096-point FFT window plus a 1024-sample hop before it can output anything — 5120 samples, ~116 ms at 44.1 kHz. The DAW compensates automatically during playback. Switch the Stem Separator off and the plugin goes back to reporting 0 samples.
Q. Can I export factory presets to share them with friends?
A. Factory presets are built in. Your user presets are plain files in the Presets folder — share them freely.
Q. Is MONKEY MASTERING heavy on the CPU?
A. Moderate. One instance per track is fine on any machine from 2015 onwards. The Stem Separator and the analysis pass use more CPU momentarily — switch off the modules you are not using.
35. Support and issue reporting
Found a bug, a crash, a preset that misbehaves, a confusing message? Tell us — every report makes the plugin better.
support@monkeymastering.com[v1.2] — [DAW + SO] — [síntoma breve]What to include in your report
- Plugin version (header — e.g. v1.2).
- OS + version (e.g. macOS 14.4, Windows 11 23H2).
- DAW + version (e.g. Ableton Live 12.0.5).
- Steps to reproduce — the shorter and more specific, the better.
- Expected vs. actual behaviour.
- If it crashes: the crash log (macOS: Console → Crash Reports; Windows: Event Viewer).
- If it is audio-related: a short 10-second WAV excerpt showing the problem, if possible.
- A screenshot of the plugin UI at the moment of the problem.
36. What’s new in v1.2 August 2026
- IMAGING module PRO — per-band stereo image in Master Final: BASS MONO (24 dB/oct Linkwitz–Riley high-pass on the side, 20–250 Hz), WIDTH MID and WIDTH HIGH (50–130%, split at 2.5 kHz). Mono-safe by construction (the mid channel is never processed), MONO Δ measured live, per-style seeds, measurement-guided ANALYZE seeding, amber correlation warning. See §15.bis.
- QUICK MASTER (SIMPLE mode) — one-screen mode: platform grid, big ANALYZE, PROOF verdict, REC. SIMPLE/FULL plate in the header; forces Master Final; saved with the session; the engine is untouched. See §5.bis.
- Guided first-run tour — 5 steps (platform → ANALYZE → automatic APPLY → verdict → REC); relaunched from the “...” menu → Tour... EN/ES.
- Virtual Speaker: 4 headphone-class profiles — Open-Back, Closed-Back, Earbuds (Unsealed) and Flat Studio Headphones join the strip (21 devices in total). Generic class curves — never a specific commercial model — and monitoring only, like every profile. See §23.
- Embedded UI fonts — the interface typefaces now live inside the plugin binary, so the UI looks identical on any machine (with no dependency on system-installed fonts).
Before that: v1.0 (July 2026)
- PROOF panel — measurement conforming to BS.1770-4 / EBU R128 in Master Final (below REC): integrated LUFS, Short-term, Max True Peak (inter-sample 4×, dBTP), PLR, LRA, stereo correlation and the PROOF seal against the platform you picked (COMPLIANT, OVER TP or the LU deviation). The per-platform table lives in the MASTER REPORT and in THE EXIT RECIPE. RESET-and-full-playthrough workflow. It passes the official EBU Tech 3341 test vectors. See §24.bis.
- Loudness engine upgrade — per-platform auto-gain now uses real K-weighted measurement (BS.1770); masters land on the exact target LUFS (Spotify −14 / Apple Music −16 / YouTube −14 / Tidal −14 / SoundCloud −14 / Beatport −10). The limiter keeps a 0.3 dB true-peak safety margin under the ceiling.
- REC export — alerts you if a disk write fails mid-take (disk full); Pro raw export covers WAV / FLAC / MP3.
- Workflow polish — loudness-compensated A/B comparison, undo with Cmd/Ctrl+Z, UI language and scale remembered across sessions, Spanish tooltips throughout the UI when the language is ES.
- Trial — 14 days with the complete set of Pro features. The licence is offline forever: no iLok, no subscription, no periodic online reauthorisation.
- Validation — it passes Apple’s official
auvaland Tracktion’spluginvalat the strictest level (10). - Monkey Engineer — new free companion Extension for Ableton Live (Live 12.4.5 beta+, Extensions enabled): guided master-chain setup with auto-configuration, set readiness check, per-track headroom check via offline render. See §31.bis.
Also in v1.0 — export and delivery
- Beatport target — 6th streaming platform, tuned to −10 LUFS / −1 dBTP for lossless DJ-store delivery. New factory preset Beatport Ready (#32).
- Raw export PRO — the REC button in Master Final captures the output to WAV 16-bit / WAV 24-bit / FLAC in real time, thread-safe (no blocking on the audio thread). MP3 was added on macOS.
- User presets PRO — save / delete / rename / import / export your own presets as portable
.mmpresetJSON files.
Also in v1.0 — the base engine
- 5-band parametric EQ — fully visible, per-band control with Sub / Low / Mid / High / Air.
- Clipper with 4× oversampling — tanh soft clip, polyphase IIR oversampling, DRIVE 0–12 dB.
- Automatic spectral analysis — more accurate Track Type + style detection, per-module APPLY.
- Stem Separator — real-time 4-stem HPSS + M/S masking, 5120 samples of latency (~116 ms @ 44.1 kHz) reported to the host.
- Virtual Speaker — studio, consumer, club and other device emulations. (21 today — see §23.)
- Factory preset expansion — including the full electronic expansion (32 factory presets).
- UI scale — from 75% to 150% in four steps (moved to the “...” menu in v1.2).
37. Appendix — catalogues and preset parameters
Everything above explains what each control does. This appendix is the other half: the flat lists you look things up in — every track type, every style, every destination, every monitoring profile and every factory preset, in one place.
37.1 · Track types — all 16
What each one changes is explained in §8. The Standard tier includes 8 of the 16; Pro unlocks all 16 (§30).
| DRUMS | RHYTHM | LEAD | VOCAL | OTHER |
|---|---|---|---|---|
| Kick Snare HiHat Toms |
Bass RhythmGuitar Piano |
LeadGuitar SynthLead SynthPad DistortedSynth |
LeadVocal BackingVocals |
FX Room FullStem |
37.2 · Music styles — all 24
What the style drives is explained in §9. The Standard tier includes 12 of the 24; Pro unlocks all 24 (§30).
37.3 · PLATFORM — targets and ceilings
How the destination works, and why it is section 10 and not section 1, is in §10.
Below, the plates in the order they appear on screen. No Target and Generic are utilities, not platforms.
| PLATE | LUFS | TRUE-PEAK CEILING | USE CASE |
|---|---|---|---|
| No Target utility | — | whatever you set | Switches the section off: it touches nothing. No loudness target and no ceiling — the limiter keeps protecting with the CEILING you left in place |
| Spotify | −14 LUFS | −1.0 dBTP | Streaming (loudness-normalised) |
| Apple Music | −16 LUFS | −1.0 dBTP | Conservative streaming |
| YouTube | −14 LUFS | −1.0 dBTP | Video platform |
| Tidal | −14 LUFS | −1.0 dBTP | HiFi streaming |
| Generic utility | −14 LUFS | −1.0 dBTP | A neutral destination for when you do not yet know where you will publish: −14 LUFS is the value Spotify, YouTube, Tidal, SoundCloud and Amazon Music agree on. Available on STANDARD too |
| Beatport v1.0 | −10 LUFS | −1.0 dBTP | DJ store (lossless FLAC, no loudness norm) |
| Amazon Music v1.1 | −14 LUFS | −2.0 dBTP | Streaming (the strictest true-peak limit of all the platforms) |
| Deezer v1.1 | −15 LUFS | −1.0 dBTP | Streaming (1 LU quieter than the −14 cluster) |
| SoundCloud | −14 LUFS | −1.0 dBTP | Social streaming |
37.4 · Virtual Speaker — the 21 profiles
What Virtual Speaker is for — and why it can never reach your file — is in §23.
| CATEGORY | PROFILES |
|---|---|
| Phone / portable | Phone Speaker, Tablet, Laptop Speakers, FM Radio |
| Earbuds | Earbuds, Earbuds Premium 2, Earbuds Premium 3, Earbuds Premium Pro |
| Bluetooth / TV | BT 15W, BT 30W, Flat TV |
| Room / car | Car, Home Cinema 5.0, HiFi 2.0 (5"), HiFi 2.1 (6.5"), HiFi 2.0 (8"), Reference |
| Headphones v1.2 | Open-Back, Closed-Back, Earbuds (Unsealed), Flat Studio |
Headphone-class profiles v1.2
| PROFILE | WHAT IT SIMULATES |
|---|---|
| Open-Back Headphones | Open enclosure: gentle sub roll-off below ~35 Hz, natural mids, a touch of air, full stereo image, no compression. |
| Closed-Back Headphones | Sealed cups: inflated lows (+3.5 dB around 100 Hz), the classic “cup” dip at 3–5 kHz, a slightly narrowed image. |
| Earbuds (Unsealed) | Loose fit with no acoustic seal: the sub simply never arrives (roll-off from ~95 Hz), a small presence lift towards 3 kHz, a narrower image. |
| Flat Studio Headphones | Near-flat reference tuning, the full 20 Hz–20 kHz, image untouched — the sanity check on headphones. |
37.5 · IMAGING — per-style seeds
The module is described in §15.bis. Picking a music style loads these measured starting points:
| STYLE GROUP | BASS MONO | WIDTH MID | WIDTH HIGH |
|---|---|---|---|
| Techno Pure / Drill / Phonk / Dembow | 110–120 Hz | 100% | 105–110% |
| EDM / House-Techno | 110 Hz | 100% | 112% |
| Trance | 100 Hz | 100% | 115% |
| Dubstep / Drum&Bass | 80 Hz (the wobble is the genre) | 100% | 108–110% |
| Hip-Hop/Trap family, Reggaeton/Latin, Afrobeats, Dancehall | 90–110 Hz | 100% | 105–108% |
| Pop / R&B-Soul | 60–70 Hz | 100% | 105% |
| Rock / Metal-Hardcore | 60–80 Hz | 100% | 100% |
| Lo-Fi / Acoustic-Indie / Jazz / Classical / Ambient / None | OFF | 100% | 100% |
37.6 · Factory presets — all 32
MONKEY MASTERING ships with 32 factory presets covering general mastering, per-style recipes, urban and Latin styles, the electronic expansion and the addition of the Beatport DJ store.
General mastering — 1 to 10
| # | NAME | MODE | CHARACTER |
|---|---|---|---|
| 1 | Default | Track | Neutral starting point — the plugin’s default state |
| 2 | Pop Radio Ready | Master Final | Bright, polished, radio-ready pop |
| 3 | Hip-Hop Knock | Master Final | Heavy bass, punchy |
| 4 | Rock Wall | Master Final | Thick midrange, glued |
| 5 | EDM Festival | Master Final | Loud, wide, bright |
| 6 | Lo-fi Bedroom | Master Final | Warm, rolled-off highs |
| 7 | Vocal Polish | Track | Transparent vocal polish + de-esser |
| 8 | Drum Bus Glue | Pre-Master | Punchy glue for the drum bus |
| 9 | Acoustic Natural | Master Final | Minimal, clean |
| 10 | Cinematic Wide | Master Final | Spacious, gentle, wide |
Style and workflow — 11 to 20
| # | NAME | MODE | CHARACTER |
|---|---|---|---|
| 11 | Reggaeton Bass | Master Final | Heavy bass, bright top |
| 12 | Jazz Warm | Master Final | Subtle, warm, open |
| 13 | Metal Crusher | Master Final | Aggressive, loud |
| 14 | DnB Energy | Master Final | Fast, wide, energetic |
| 15 | Podcast Voice | Track | Voice clarity + de-esser |
| 16 | Synthwave Neon | Master Final | 80s retro, warm and wide |
| 17 | Bass Track | Track | Bass instruments, controlled low end |
| 18 | Spotify Ready | Master Final | Optimised for the Spotify loudness target |
| 19 | Guitar Amp | Track | Lead guitar, bright mid push |
| 20 | Trap 808 | Master Final | Heavy sub-bass, crispy highs |
Urban and Latin — 21 to 28
| # | NAME | MODE | CHARACTER |
|---|---|---|---|
| 21 | Melodic Trap Sheen | Master Final | Atmospheric 808s, vocal clarity |
| 22 | Drill Knock | Master Final | Dark, sliding 808s, punchy snares |
| 23 | Phonk Drift | Master Final | Distorted 808s, aggressive lo-fi |
| 24 | Afrobeats Bounce | Master Final | Groove-focused, warm bass, vocal presence |
| 25 | Dembow Punch | Master Final | Punchy bass, fast rhythm, bright |
| 26 | Latin Heat | Master Final | Atmospheric, 808s + Latin percussion |
| 27 | R&B Vocals | Master Final | Smooth, vocal-forward, polished |
| 28 | Dancehall Riddim | Master Final | Bass pulse, bright highs, wide |
Electronic expansion and DJ store — 29 to 32 v1.0
| # | NAME | MODE | CHARACTER |
|---|---|---|---|
| 29 | Dubstep Growl | Master Final | Massive bass, aggressive mids, tight |
| 30 | Trance Euphoria | Master Final | Wide, bright, energetic |
| 31 | Techno Warehouse | Master Final | Driving, dark, controlled |
| 32 | Beatport Ready | Master Final | House/Techno seed, Punch compression, Mid/Side on, Beatport target −10 LUFS |
38. Basic troubleshooting
While installing and activating
| What you see | What is happening, and how to fix it |
|---|---|
| The plugin does not appear in the DAW | Rescan VST3/AU. Check that the file is in /Library/Audio/Plug-Ins/VST3/ (macOS) or C:\Program Files\Common Files\VST3\ (Windows). Restart the DAW. |
| Gatekeeper rejects it on macOS | That is expected on first launch: the builds carry an ad-hoc signature, they are not notarised. Right-click the bundle → Open → confirm, or System Settings → Privacy and security → Open anyway. Once per machine. |
| The licence is not accepted | Copy and paste it with no trailing spaces, and check your connection. The most common cause is that your two activations are already in use → press DEACTIVATE on a machine you no longer use, or write to support@monkeymastering.com so we can free one for you. |
| The badge went back to TRIAL after a system update or after renaming the computer | Activate again with the same key: click the badge → paste → ACTIVATE. Your licence file has not been lost. If the key is rejected because your two activations are in use, write to support@monkeymastering.com and we will free one. |
| I paid for PRO but the badge reads STANDARD | This is not something you can fix yourself — write to support@monkeymastering.com with your order number. Do not buy again. |
| The trial has expired — the audio comes out unprocessed | That is the correct behaviour, not a fault: after 14 days processing is bypassed until you activate a licence. The plugin stays loaded, but the audio comes out untouched. Click the badge in the header, paste your key and press ACTIVATE. |
| The exported file drops in level every 30 seconds | That is the trial export mark (−12 dB for 300 ms, every 30 s from second 15) and it only exists in the written file. Activate a Standard or Pro licence and export again — licensed exports are never marked. |
| The purchase email has not arrived | Look in spam and promotions and search for “Monkey Mastering” or “Lemon Squeezy”. Nothing after 15 minutes? Write to support@monkeymastering.com with the email you used at checkout. |
While you work
| What you see | What is happening, and how to fix it |
|---|---|
| A section only shows its title | You are in BASE and it is folded, not switched off. Click its header. A folded section still shows its readout and its ON switch still works. |
| A track type or a style is greyed out | It belongs to the PRO catalogue. |
PROOF says NO TARGET | You have not picked a destination yet. Choose one in PLATFORM. |
PROOF says MEASURING and does not change | It needs audio. Play the track. |
PROOF says Δ ±x LU | Your integrated loudness is off target. Adjust LEVEL until it lands within ±1 LU of the target; then RESET and a full playthrough again. |
PROOF says OVER TP | Something after MONKEY MASTERING is raising the peaks — MONKEY MASTERING must be the last device in the chain. Then RESET and a full playthrough again. |
| ANALYZE finished but almost nothing changed | It is probably THE HONEST NO: your track already meets the selected target, so MONKEY MASTERING refused to process it. Press WHY? to read the measured reasons. |
| ANALYZE does nothing at all | Make sure the audio is really playing (no bypass, no silence). Let about 20 s of the loudest section play while ANALYZE works — the chain applies itself when it finishes. |
| The bounce does not sound like my monitoring | That is expected if you have Virtual Speaker or Codec Preview switched on: they are monitoring only and the plugin leaves them out whenever the host renders offline, so an offline bounce and the REC file are always the clean master. The only case where the colouring can reach a file is a real-time capture of the master output: there you are recording what you hear. Set the profile back to --- None --- first, or use REC, which is taken before the simulation and never comes out coloured. |
| Audio crackles or glitches | Raise the audio buffer (256 / 512 samples). Switch off the Stem Separator — it is the one heavy feature here: leave it off on individual tracks and save it for a single instance on the master bus. Watch the CPU meter. |
| Integrated LUFS stays at −∞ | Press RESET and restart playback from the chorus or the densest section, not from silence. |
| The master sounds too quiet on Spotify | Print to −14 LUFS integrated, with true peak ≤ −1 dBTP. Avoid over-limiting. |
| The kick disappears in mono | Width is too high. Narrow the sides and check mono compatibility before exporting. |
| The Stem Separator mixes the kick with the bass | Expected on very tight mixes. Use Stem mode to rebalance at mastering level, not to extract a cappellas. |
| The sidechain knobs do nothing | The trigger comes from the DAW’s external sidechain input. Route the kick to MONKEY MASTERING’s sidechain input in your DAW. |
| REC shows a disk alert | The destination disk filled up or became unavailable mid-take. Free some space or pick another drive, and record the take again. |
| The interface is too small or too big | Preset menu “...” → UI scale → 75% / 100% / 125% / 150%. The window does not resize by dragging. |
Where to go next
| You want to… | Go to |
|---|---|
| Master your first track | Quick Start |
| Install or activate your licence | Installation guide |
| Buy a licence, or go from Standard to Pro | Buy · Upgrade |
| Download the builds, or write to us | Downloads and support |