

QUICK START
v1.2
1. What it is and where it goes
MONKEY MASTERING is a mastering plugin that works by measuring. You play your audio, it listens for about 20 seconds and builds its chain from what it actually heard — not from a preset that guesses. Then it tells you, with numbers, whether the result meets the platform you are sending it to.
It is a plugin (VST3 on Mac and Windows, AU on Mac) and it also runs on its own, as an application, with no DAW. You insert it like any other plugin, in one of these two places:
| Where | Set Mode to | What it does there |
|---|---|---|
| The master bus the normal case | MASTER FINAL | Masters your finished mix: the whole chain, plus the platform target and the true-peak ceiling. This is the one you want for release. |
| A single track | TRACK | Cleans up and shapes one element — a vocal, a kick, a bass — before it reaches the mix. |
| A group or stem bus | PRE-MASTER | Middle ground: the track treatment plus stereo width and saturation. |
MASTER FINAL and follow the three phases below. Everything
else on this page is optional.2. The window, part by part
Hover over a number — or tap it on a phone — to see what that part of the plugin does. This is the short version: every control, one by one, is in the manual.
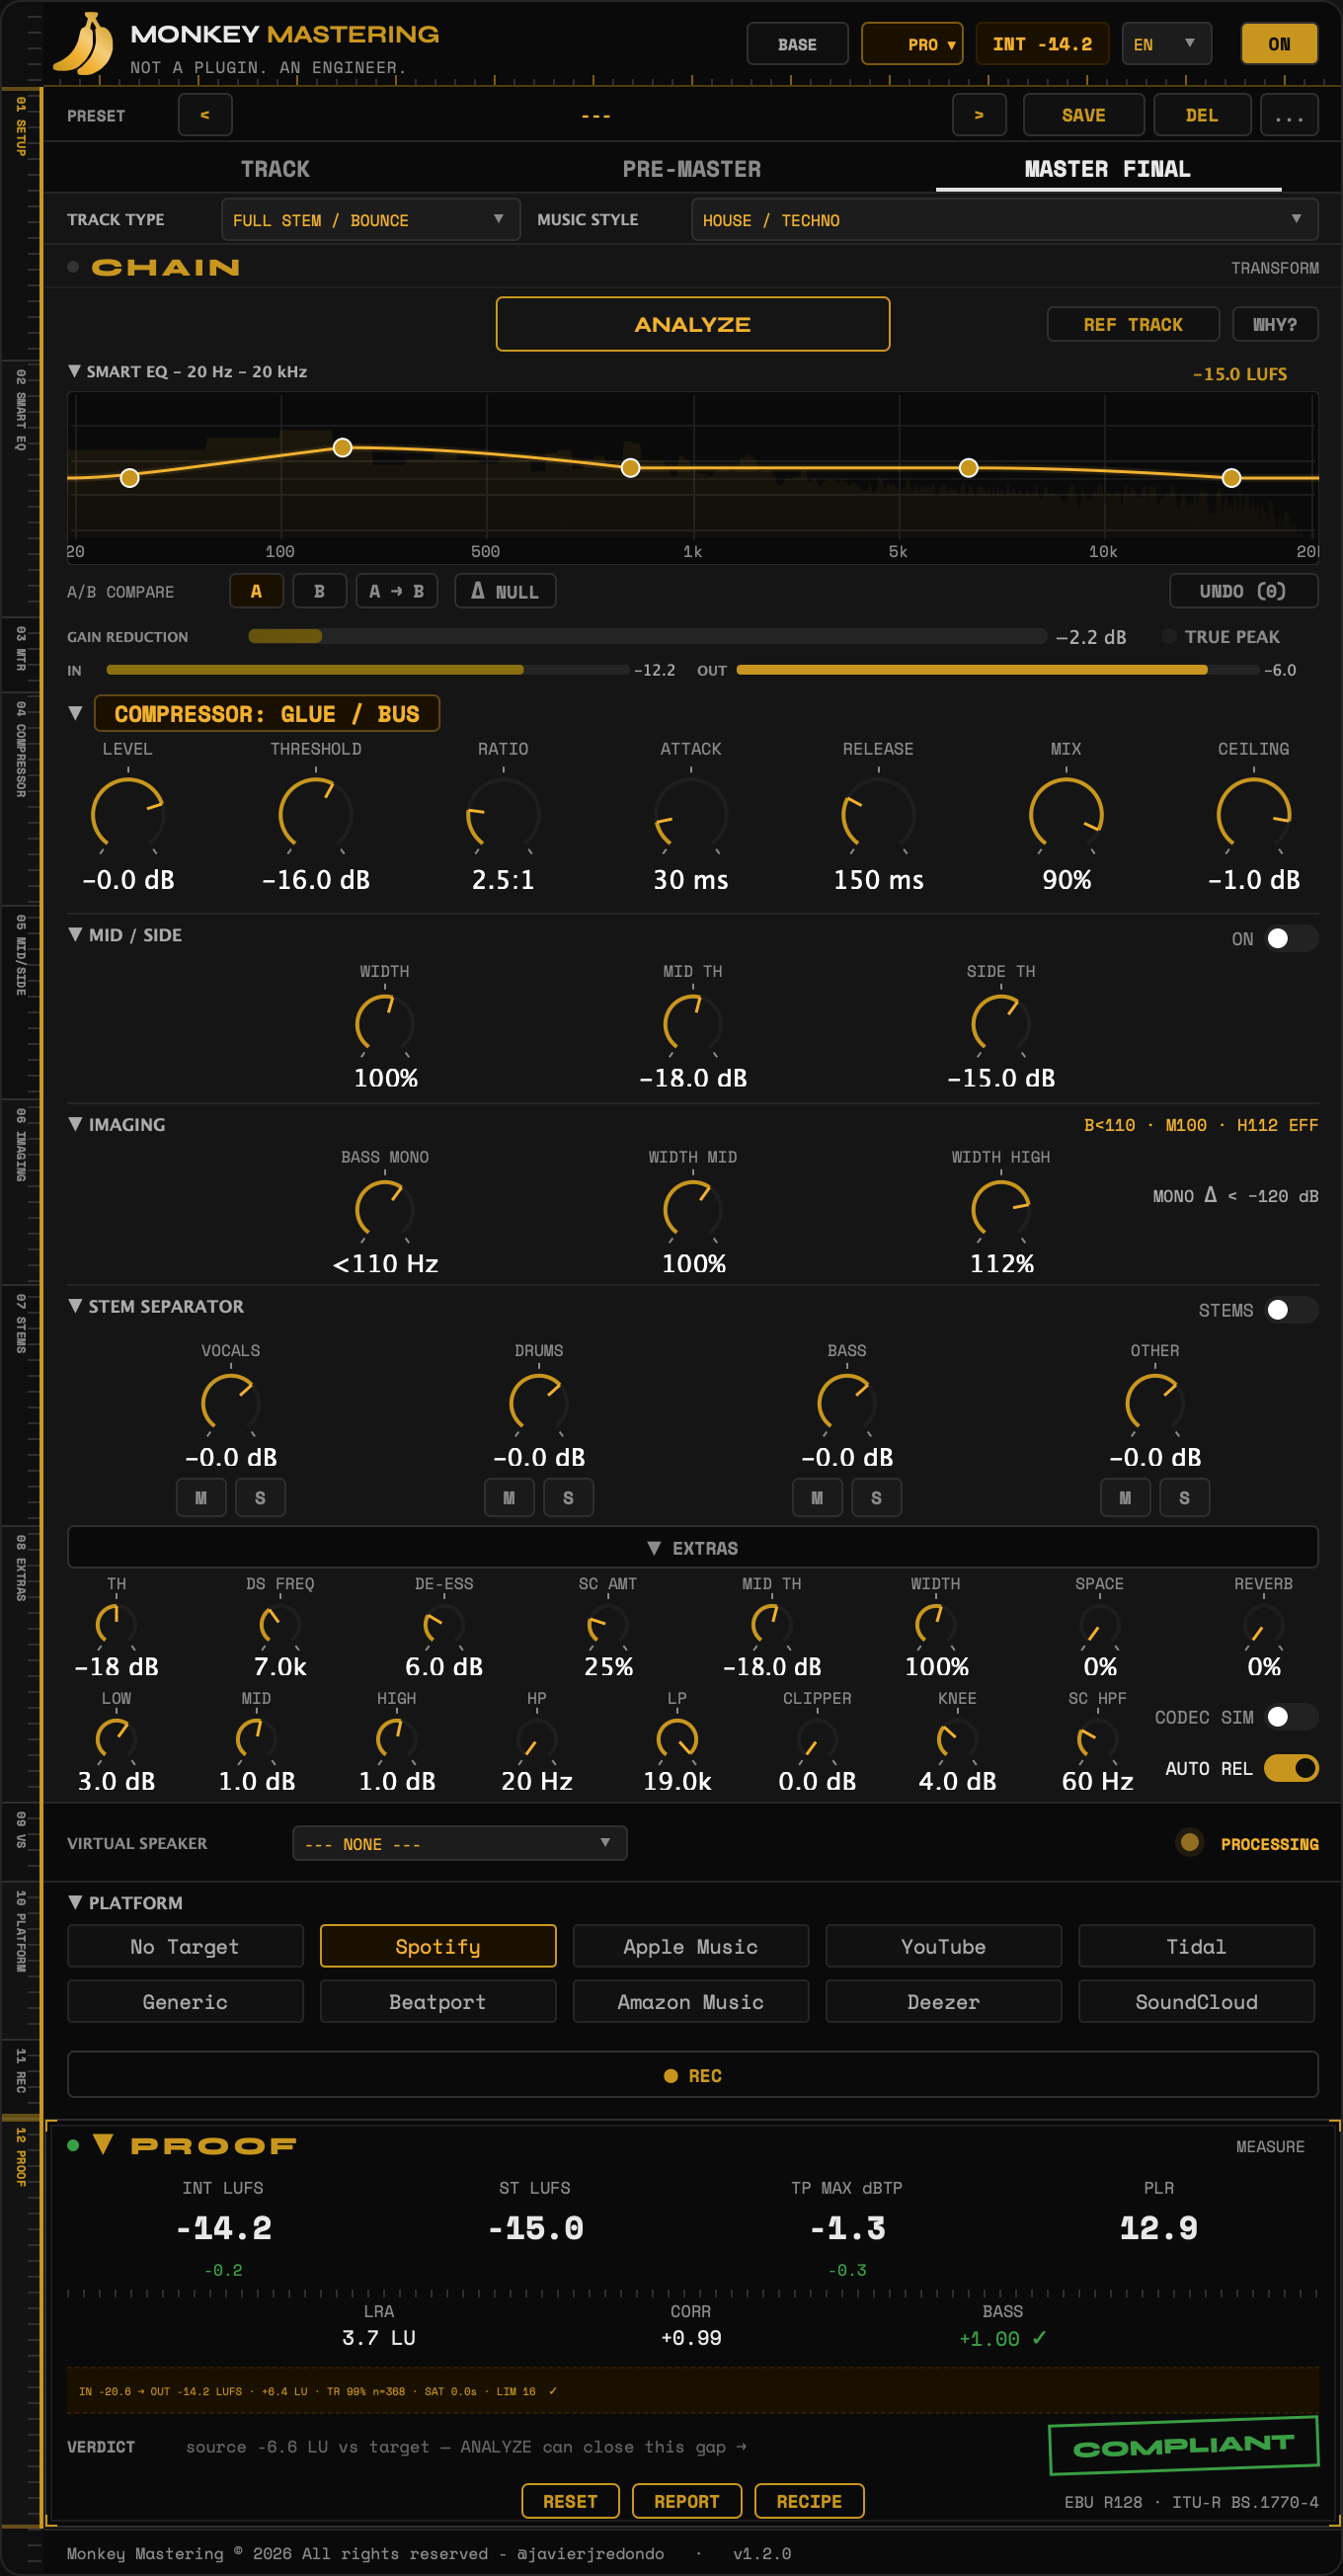 •HeaderYour view (BASE / EXPERT), your licence, the integrated loudness, the language and the master on/off.
01SETUPPreset, mode, and what you are mastering: track type and music style.
02SMART EQFive bands drawn over your real spectrum. Drag any of them.
03METERSHow hard it is compressing, and the input and output levels.
04COMPRESSORThe compressor. The analysis sets these seven knobs — you can still move them.
05MID/SIDEStereo width, and separate compression for the centre and the sides.
06IMAGINGBass to mono below a frequency, and width per band.
07STEMSSplits the mix into vocals, drums, bass and the rest. Heavy on the computer — see §5.
08EXTRASDe-esser, sidechain, filters, clipper and the advanced compressor controls.
09VIRTUAL SPEAKERHear your master as a phone or a laptop would play it. It never reaches the file.
10PLATFORMWhere it goes. Sets the loudness target and the true-peak ceiling.
11RECWrites the result to a file straight from the plugin.
12PROOFThe verdict, measured. COMPLIANT in green means it meets the destination you chose.
•HeaderYour view (BASE / EXPERT), your licence, the integrated loudness, the language and the master on/off.
01SETUPPreset, mode, and what you are mastering: track type and music style.
02SMART EQFive bands drawn over your real spectrum. Drag any of them.
03METERSHow hard it is compressing, and the input and output levels.
04COMPRESSORThe compressor. The analysis sets these seven knobs — you can still move them.
05MID/SIDEStereo width, and separate compression for the centre and the sides.
06IMAGINGBass to mono below a frequency, and width per band.
07STEMSSplits the mix into vocals, drums, bass and the rest. Heavy on the computer — see §5.
08EXTRASDe-esser, sidechain, filters, clipper and the advanced compressor controls.
09VIRTUAL SPEAKERHear your master as a phone or a laptop would play it. It never reaches the file.
10PLATFORMWhere it goes. Sets the loudness target and the true-peak ceiling.
11RECWrites the result to a file straight from the plugin.
12PROOFThe verdict, measured. COMPLIANT in green means it meets the destination you chose.
The numbers are the plugin’s own: that strip down the left edge is its section index, and it renumbers itself.
3. BASE or EXPERT
There is only one interface. BASE opens it with the sections you rarely touch already folded; EXPERT opens it fully. Same window, same controls, same order — folding changes nothing about how it sounds.

W 100%) and its
ON switch still works. Folded is not switched off.
You switch with the plate at the top right of the header, or from the
“...” menu. The first time you open the plugin it asks which one
you want.
4. Your first master — 3 phases, 6 steps
Three phases that contain six steps. The plugin walks you through them the
first time you open it, and you can repeat that walkthrough whenever you like from the
“...” menu.
What are we mastering?
Pick the Track Type and the Music Style. That is all the context the engine needs to know what is “right” for your material.
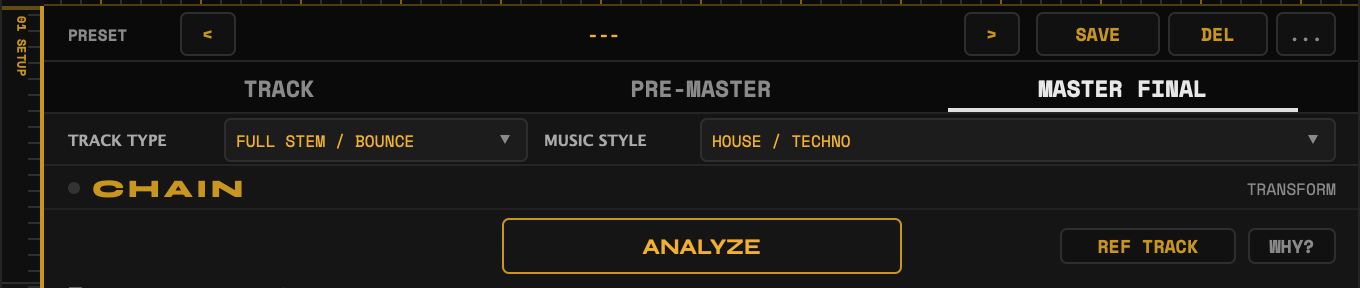
ANALYZE
Play the loudest part of the track and press ANALYZE. Give it about 20 seconds. It is measuring your real audio — the loudest part is the one that will have to deal with the limiter, and that is why it is the part worth measuring.
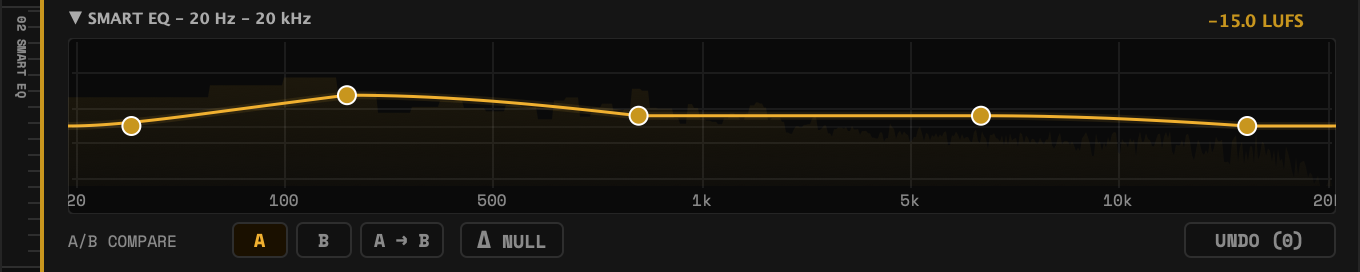
Applying is automatic
When the analysis ends the whole chain sets itself and the dot on the CHAIN plate stays solid gold. You do not have to press anything.
And if your mix was already fine, it says so instead of processing it. That is the
Honest No: a line in the PROOF panel telling you there was
nothing worth touching. The WHY? button — top
right of the chain, next to REF TRACK — opens the reasons,
explained.

Where is it going?
Pick your destination in PLATFORM. That sets the loudness target and the true-peak ceiling the master has to respect — and it is the question answered by the next step.
No Target and Generic are not platforms, they are shortcuts: No Target touches nothing (use it while you are working) and Generic is a safe middle ground for when you do not yet know where the track will end up.

The verdict
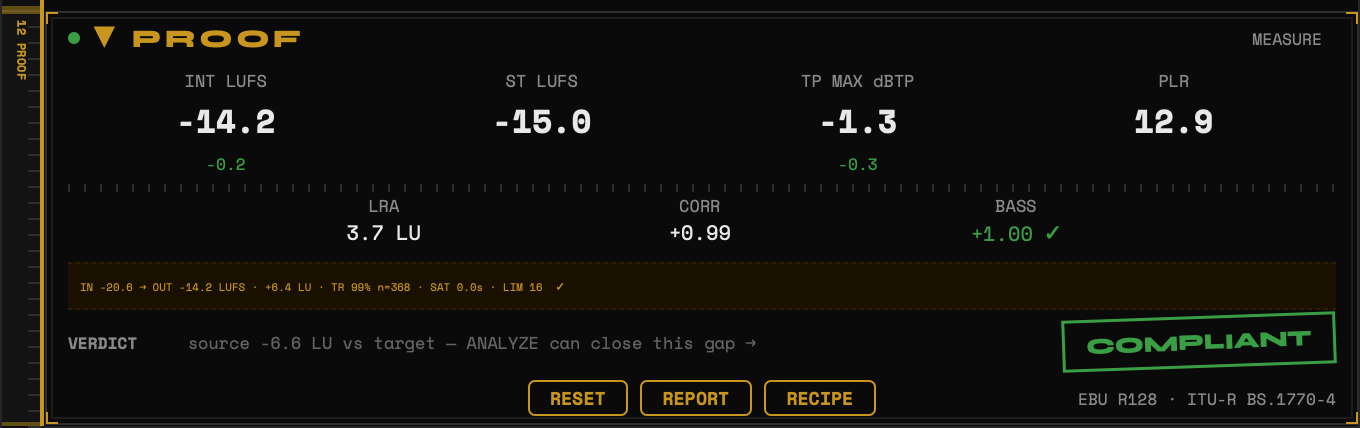
Play the whole track once and read PROOF. The seal on the right is the answer: it reads COMPLIANT, in green, when the master meets the destination you chose. Here green is earned — in this plugin nothing is green for decoration.
| The seal says | Which means |
|---|---|
NO TARGET | You have not picked a platform yet, so there is nothing to measure against. |
MEASURING | Keep listening. Let the track run. |
COMPLIANT | It meets the target and stays under the ceiling. Ready to send. |
OVER TP | True peak is above what the platform allows. |
Δ ±x LU | How far the loudness still is from the target. |
The two small green numbers under the big figures are the distance to the target (loudness) and to the ceiling (true peak) — which is why they only appear under those two.
Want to hear exactly what the plugin changed? Δ NULL, in the A/B row under the EQ, plays the difference only: your audio subtracted from the processed signal. If you can barely hear anything, it has barely done anything.
Export
Bounce from your DAW as you always do — the plugin prints exactly what you heard. Or press REC, in the section just above PROOF, to write the file from the plugin itself.
5. Before you stack many instances
6. If something does not add up
| What you see | What is happening, and how to fix it |
|---|---|
| A section only shows its title | You are in BASE and it is folded, not switched off. Click its header. A folded section still shows its readout and its ON switch still works. |
| A track type or a style is greyed out | It belongs to the PRO catalogue. |
PROOF says NO TARGET | You have not picked a destination yet. Choose one in PLATFORM. |
PROOF says MEASURING and does not change | It needs audio. Play the track. |
PROOF says Δ ±x LU | Your integrated loudness is off target. Adjust LEVEL until it lands within ±1 LU of the target; then RESET and a full playthrough again. |
PROOF says OVER TP | Something after MONKEY MASTERING is raising the peaks — MONKEY MASTERING must be the last device in the chain. Then RESET and a full playthrough again. |
| ANALYZE finished but almost nothing changed | It is probably THE HONEST NO: your track already meets the selected target, so MONKEY MASTERING refused to process it. Press WHY? to read the measured reasons. |
| ANALYZE does nothing at all | Make sure the audio is really playing (no bypass, no silence). Let about 20 s of the loudest section play while ANALYZE works — the chain applies itself when it finishes. |
| The bounce does not sound like my monitoring | That is expected if you have Virtual Speaker or Codec Preview switched on: they are monitoring only and the plugin leaves them out whenever the host renders offline, so an offline bounce and the REC file are always the clean master. The only case where the colouring can reach a file is a real-time capture of the master output: there you are recording what you hear. Set the profile back to --- None --- first, or use REC, which is taken before the simulation and never comes out coloured. |
| Audio crackles or glitches | Raise the audio buffer (256 / 512 samples). Switch off the Stem Separator — it is the one heavy feature here: leave it off on individual tracks and save it for a single instance on the master bus. Watch the CPU meter. |
| Integrated LUFS stays at −∞ | Press RESET and restart playback from the chorus or the densest section, not from silence. |
| The master sounds too quiet on Spotify | Print to −14 LUFS integrated, with true peak ≤ −1 dBTP. Avoid over-limiting. |
| The kick disappears in mono | Width is too high. Narrow the sides and check mono compatibility before exporting. |
| The Stem Separator mixes the kick with the bass | Expected on very tight mixes. Use Stem mode to rebalance at mastering level, not to extract a cappellas. |
| The sidechain knobs do nothing | The trigger comes from the DAW’s external sidechain input. Route the kick to MONKEY MASTERING’s sidechain input in your DAW. |
| REC shows a disk alert | The destination disk filled up or became unavailable mid-take. Free some space or pick another drive, and record the take again. |
| The interface is too small or too big | Preset menu “...” → UI scale → 75% / 100% / 125% / 150%. The window does not resize by dragging. |
Where to go next
| You want to… | Go to |
|---|---|
| Install or activate your licence | Installation guide |
| Learn every control, one by one | User manual |
| Buy a licence, or go from Standard to Pro | Buy · Upgrade |
| Download the builds, or write to us | Downloads and support |